The blog has moved to a new home:
http://www.allaboutthehouseprintablesblog.com/

Visit the online store to download these FREE rainbow bookplate labels! They are 3 x 4 inch and are intended for printing onto full sheet label paper and cut, then place in the inside cover of your children’s books! Can also be printed onto plain paper or cardstock and glued onto the inside cover of the book.
Free printables are for PERSONAL USE ONLY.

More free printables can be downloaded here.
If you are interested in the Mega Household Binder Pack from the simple planner series (no chevrons) go check out this kind review from RoadtoHomesteading

I love hearing how customers use my printables! To say thanks I am offering 20% off in the Etsy shop ($5 minimum spend) to blog readers only (apply the coupon 20OFF) at the checkout until April 19, 2015!
WHY PRINTABLE?
I live in Australia, most of my customers live in the USA and shipping is very expensive and takes a long time! I conducted a poll in this post and most of the feedback was that customers would not be willing to wait the amount of time it takes to deliver mail from Australia to the USA. Printable means I can offer the designs at a cheaper price than printed stickers and, once you purchase the file you can print the stickers as many time as you like for your personal use. If you run out of stickers just print another sheet… or 10 😉 Printable files are like the gift that keeps on giving!
All of my sticker files are affordably priced and you get get a bargain if your purchase the Get it All sticker bundle!
__________________________________
WHERE CAN I PURCHASE THE STICKERS?
A sample of sticker designs are available in my Etsy store. All are available in the online store.
__________________________________
WHAT LABEL/STICKER PAPER SHOULD I USE?
You can buy full sheet label paper from:
Worldlabel (Worldwide but expensive shipping to Australia)
Online Labels they even have metallic label paper (which I am dying to try!) (Worldwide but expensive shipping to Australia)
Office Depot (US only)
Amazon (Worldwide but expensive shipping to Australia)
Walmart (US only)
Officeworks (Australia only)
Staples (US and Australia)
Ebay (Worldwide)
Labelsbythesheet (US only)
Sheet Labels (US only)
And of course, Avery.
I have found that the ‘unofficial’ label paper (i.e. anything but Avery) is cheaper and works just the same! Most are compatible with both inkjet and laser printers but be sure to check before purchasing.
Matte sticker paper is easier to write on that Glossy. You can also purchase repositionable sticker paper.
I purchase my label paper off Ebay.
0.5 x 0.5″ square stickers fits 270 stickers per 8.5 x 11″ sheet. You can purchase full sheet re-positionale label paper for 30c a sheet or 0.001c per sticker! Shops selling printed and cut stickers charge $4 for around 30 stickers of the same size. You also need to pay shipping on top of that. And wait for them to arrive in the mail. With printable stickers you receive them within minutes of your purchase. An added bonus – the Australian Dollar is currently only buying around 75cUSD this means, because of the exchange rate, if you live in the USA these stickers are actually even cheaper! (I live in Australia)
__________________________________
WHAT ARE EDITABLE STICKERS?
Currently, the only editable stickers are the morning/day/night section titles.
EDITABLE PDF FILES:
– When you open the file there will be light blue boxes where you can type in your information (this will NOT remain light blue when printed).
– You can still print and hand-write on the sheets (the blue boxes won’t appear on your printed copy)
– The fillable font is helvetica in black
– For copyright protection, the layout of the documents, including existing text cannot be changed
– You CAN save information typed into the PDF. I recommend saving the original version as ‘blank’ if you would like to make multiple sticker sheets.
– You will need a computer (not an ipad or iphone) to open and edit PDF files.
__________________________________
FILE FORMAT
Most of the stickers come in 2 file format:
PDF: If it’s not already installed on your computer you will need to download it here (it’s free!). Note: You will need a computer to open and print PDF files.
JPG: this file format is compatible for use with your silhouette cutting machine and printing at home (print the sticker sheet/image as a full page photo)
__________________________________
HOW DO I PRINT THE STICKERS?
These instructions will work for any of the planner / calendar stickers available in my shop including:
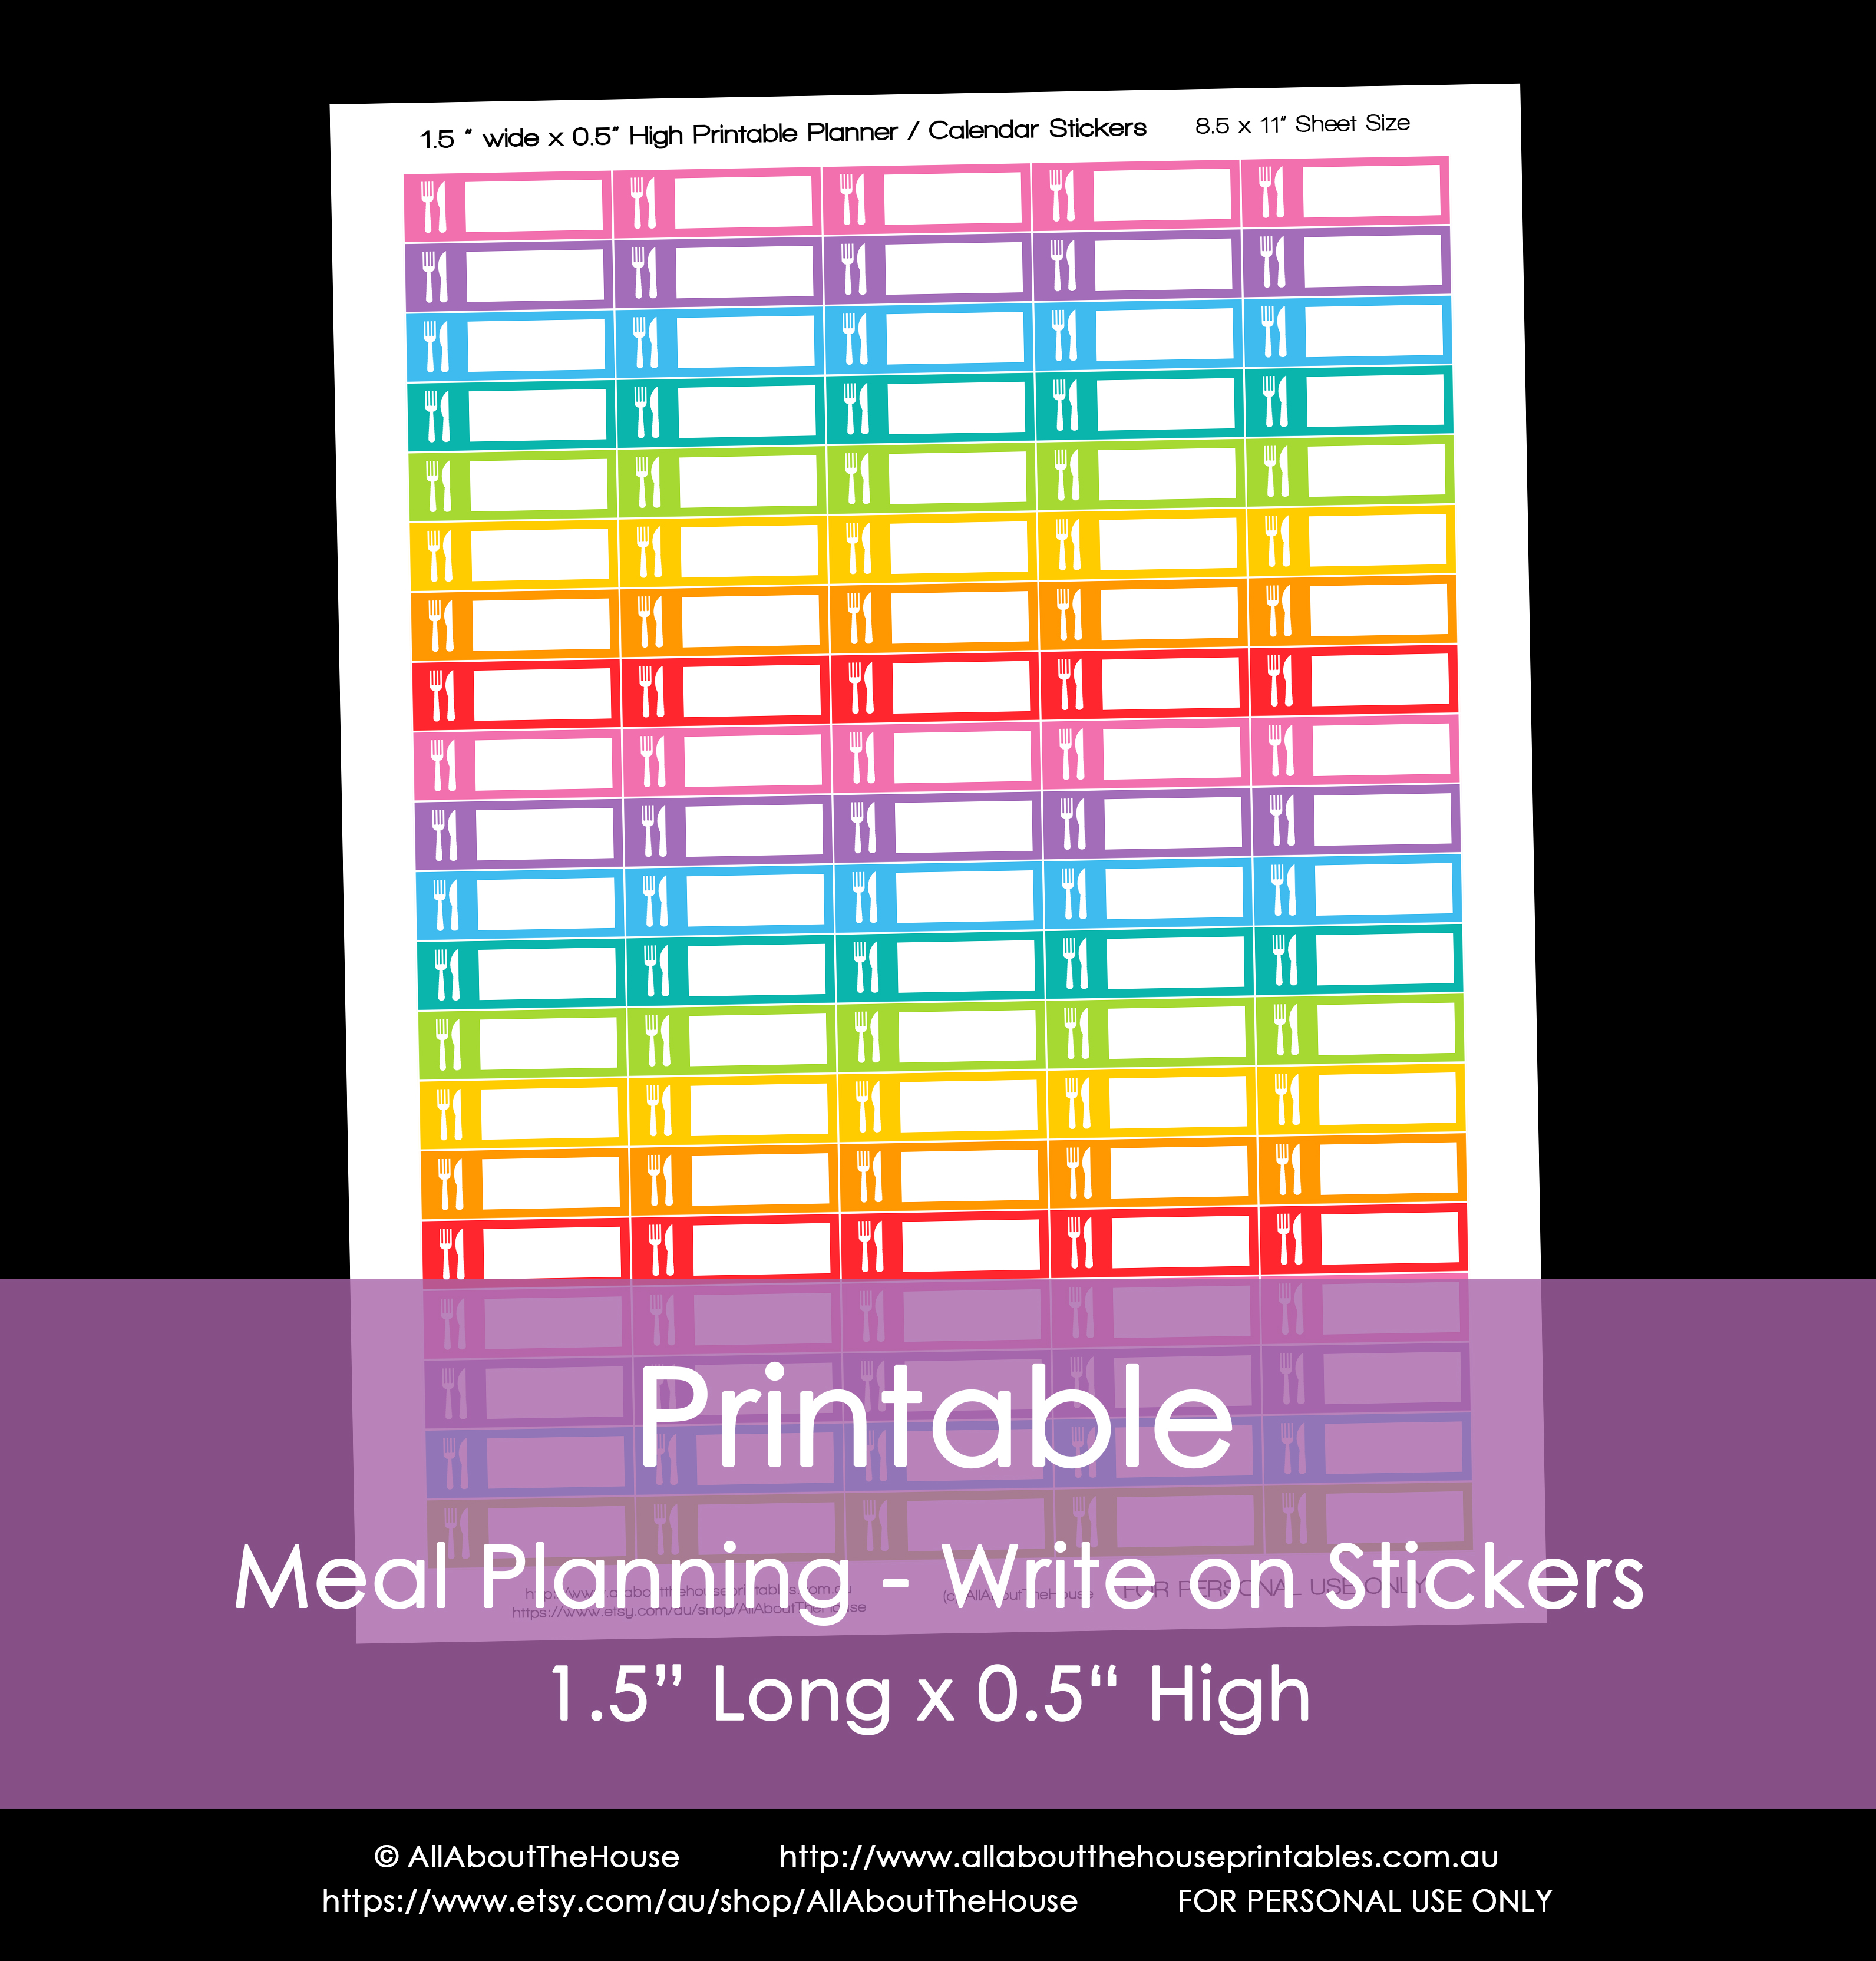
I am going to demonstrate using the 1.5inch x 0.5inch stickers. These stickers are formatted for printing onto these letter size sticker sheets so you can easily print them from home. Or you can just print onto normal copy paper or cardstock and use glue to adhere, more on that below.
As always I recommend doing a test print onto a piece of scrap paper before printing multiple sheets onto sticker paper.
Note that all printers are different. I am using a Canon printer – if you are using a different brand your printer menu may display a little differently. There are so many different types of printers out there I do not know how to use every printer so unfortunately I may not be able to help if you have problems printing. Please follow the step-by-step guide below if you are having difficulties. Want to consult your printer manual but can’t remember where you put it? See this website to view free printer manuals for any type of printer.
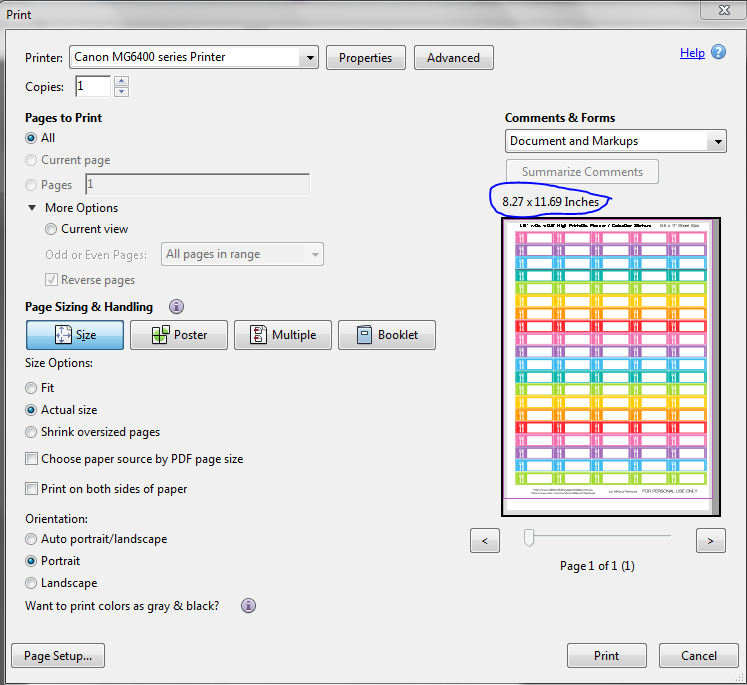
Printing the PDF File onto Letter Size Paper
1. Open the file. Go to the top left hand corner, press file and then print.

2. The printer menu will open.
Make sure ‘actual size’ is selected then click on ‘properties’

3. A new menu will open – change the page size to letter size

I have not noticed a difference between printing on ‘standard’ and ‘high’ print quality settings
4. Press ‘OK’ to close that menu, then press ‘Print’
Printing the PDF File onto A4 Size Paper
If, like me, you live in Australia, you can still use these. The only change is the amount of white space around the design. The stickers are in no way affected and still print perfectly! 🙂
1. Open the file. Go to the top left hand corner, press file and then print.
2. The printer menu will open.
Make sure ‘actual size’ is selected then click on ‘properties’
3. Change the page size to A4

5. Click OK. The first menu will now look like this
I have not noticed a difference between printing on ‘standard’ and ‘high’ print quality settings
4. Press ‘OK’ to close that menu, then press ‘Print’
Note: if you live in Australia and keeping the stickers at 1.5″ wide is important – make sure you print using the PDF file as I have found the JPG file alters the size of the stickers to 1.6″ long… or maybe that’s just my printer. This size printing error also occurred even if I un-checked the ‘fit picture to frame’ button so if maintaining the exact size is important to you please print using the PDF!
Printing the JPG File
1. Open the JPG and click the black arrow (point down) next to ‘print’

2. A new window will appear. Click on ‘options’ then ‘printer properties’ this will take you into the same printer menu as for printing a PDF. Change the paper size if need be. Click on ‘options’ in the bottom right and make sure the correct page size and print quality if you wish to print on ‘high quality’ is selected.

3. IMPORTANT: when I print the stickers using the the jpg they did not print correctly when the ‘fit picture to frame’ box was ticked so be sure to UNTICK this box! This is what worked for my printer – yours may be different. As always I recommend doing a test print onto a piece of scrap paper and in greyscale before printing multiple sheets onto sticker paper as all printers work differently (I also recommend writing down or taking screenshots of the printer options you selected so you can refer back to them if needed).

__________________________________
WHAT IF I DON’T HAVE STICKER PAPER?
Buy it! Seriously it’s worth it. If you don’t want to buy a lot you can order a few sheets from Labelsbythesheet. Label paper is very inexpensive if purchased in bulk e.g. from OnlineLabels
If you do not have label paper you can print onto normal printer paper and use glue or glue tape to adhere. I would recommend cardstock though as the colours print more vibrantly and are not see-through on thicker paper. I recommend ‘quill board’ which is thicker than copy paper at 210GSM. I also use this for printable notecards. You can buy it at Officeworks. I’m sure places like Staples in the US sells something similar. Even though it’s thicker than normal copy paper it doesn’t jam my printer. Amazon also sells cardstock.
Another option is to cut contact paper to letter size, peel back the sticky edge and stick the printed stickers to the contact sticker i.e. order will be: contact paper, printed stickers and then the back of the contact paper. I recommend trimming the white edge off the printed stickers so the contact paper stickers to the back (non-sticky side that comes with the contact paper). Cut or punch out as needed then peel back for stickers. Not sure if contact paper is called the same thing in the USA but this looks similar.
__________________________________
CUTTING YOUR STICKERS
I have found that the most efficient method of cutting is to:
1) Cut off the white space on the top, bottom and sides
2) Cut the remaining into strips horizontally going across the width of the page
3) Cut the smaller strips still using your paper trimmer or using scissors.
The reason I cut horizontally is that there is less to cut (as you are cutting the width not the length of the sticker which is longer) but it is up to you to cut whichever way works best for you!
Tip: I print off sticker sheets then cut them during ad breaks while watching TV. I have found that I can cut up to 3 sticker sheets at once using my guillotine.
__________________________________
WHAT DO YOU USE TO CUT THE STICKERS?
I use a guillotine I purchased a few years back. I can’t remember where I bought it from but it is similar to this one. I prefer that style of paper trimmer to this style as I find it easier to see where I’m cutting and easier to cut multiple sheets at once.
For the flag stickers I use scissors for the flag ends. If you want round stickers I recommend using a craft punch such as this one. Medium size scissors are preferable as the blade is too large on large scissors and I’ve found small scissors make my hand cramp after about 5 sticker sheets.
_________________________________
I will discuss how I organize my stickers in an upcoming post!
See all available stickers HERE
Want custom stickers or have an idea for a sticker not currently listed in the shop? Email me at allaboutthehouseetsy@yahoo.com.au or contact me via Etsy or the online store – I’m always open to suggestions 🙂
Customers often ask me if they can use the printable stickers with their silhouette machine. The answer is yes! Stickers in my shop are sold in both JPG and PDF file formats. There are many tutorials on the internet that show you how you can print and cut stickers using your silhouette with a JPG file.
1. Open the JPG file into your silhouette studio software
2. Reduce the size of the sticker sheet if needed to fit 8.5 x 11″ page size
3. ‘Show’ registration marks
4. As the JPG sticker sheets are not pre-formatted to print using the silhouette, you may need to reduce the size of the sticker sheet slightly (hold down shift and drag inwards to maintain the stickers’ proportions e.g. square shape). If you do not want their size to reduce, then do not resize and just let some of the stickers get cut off the page when they print OR crop out the white space and some of the stickers so they fit within the registration marks
5. Trace around the stickers to create cut marks
6. Print the stickers onto full sheet sticker paper
7. Change your blade settings as advised by your Silhouette machine
I do not own a silhouette machine. I cannot justify the cost when it only takes me 5 minutes to cut (I use a guillotine) a sticker sheet with 270 stickers such as these which will keep me organized all year long. Lately, I have taken to printing and cutting 3 sheets of the half inch square stickers at a time making the process even quicker! The 1.5″ long x 0.5″ high stickers are designed to print on this sticker paper from online labels, or you can print and cut by hand, using an exacto knife, paper trimmer, scissors ect. Instant download printable files also means instant gratification, free shipping, no waiting for the postman and if you run out of stickers just print another sheet! 🙂
Some tutorials that may help if you wish to cut stickers using your silhouette machine:
– Download Silhouette Studio
– Importing jpg files into Silhouette Studio Software – JoysLife
– Print & Cut – WendyBirdDesigns
– Print & Cut – JoysLife
– Print & Cut – TheScrapMaster
– Print & Cut – Silhouette America
– Youtube
P.S. AllAboutTheHouse Printable Stickers are for your personal use only – thank you!
Click here to shop for planner stickers! Also available on Etsy
UPDATE: For my fellow sticker addicts, you can now purchase all printable planner stickers currently available in the shop for 80% off!!! The bundle is only available on Etsy.

In the AllAboutTheHouse Etsy shop, it is currently 40% OFF WHEN YOU SPEND $30 OR MORE!! Enter the coupon ‘SAVE40’ at the checkout.
The Get it all Bundle (1247 planner pages and 21 sets) is less than $50!
See here for instructions on using coupon codes. Coupon must be applied at time of purchase (do NOT enter it in the notes to seller when checking out). No refunds/discounts given for past purchases or if you forget to enter the coupon code.
50% off (no minimum spend) in the digital paper shop! (Use the coupon ‘SAVE50’)
This sale promotion does not apply to the online store but remember that you earn reward points for any orders place through the online store (which can be used to get a discount off your order!)
There’s a new rewards program in the online store! Earn points for every purchase you make then cash in points for a discount off your next purchase. Earn 200 reward points just for signing up! 🙂

Plus if you refer a friend and they make a purchase, your friend will receive 15% off their first order and you will receive 200 points as a thank you for referring them!
After logging into your account, click on ‘Referrals’ then copy your referral link and share on your blog, Facebook, Twitter, Youtube videos, email to your friends ect!

When someone clicks/opens your referral link, this message will appear (I’ve blacked out names for privacy). All they need to do is enter their email address where their unique one time use coupon code will be sent.

Then they create an account…

…and start shopping!
To redeem their 15% off, they need to enter the coupon code (that is sent to the email address they enter – refer above) at the checkout

Click ‘go’. After the discount has been applied click ‘proceed to checkout’ to process payment (or keep shopping!)
After they place their order, you will recieve a notification saying you have earned points (this email may go to your spam folder), you can also check how many reward points you have by logging into your account then clicking ‘redeem’

a menu will appear which tells you how many reward points you have and what you can use them for

Click ‘Redeem’ to choose your reward. A coupon code will then be generated which you can enter at the checkout. Important! Make sure you are logged into your account then use the coupon code. If you are not logged in, the coupon code will not work!

Comment below or send an email to allaboutthehouseetsy@yahoo.com.au if you have any questions!
Click here to start shopping!
If you follow my blog you may remember the post I did 2 years ago (how time flies) on my finance binder. Since that post my budget planner has undergone some major revamps (both from my personal budgeting style and queries from customers) and the finance set has now been updated and expanded to the new and improved Budget Binder – it now has 207 printables! And all pages are EDITABLE except the covers and dividers!
(Click the images below to enlarge the previews, then click the back button to return to this post!)
![]()
![]()
![]()
I may have gone a bit overboard – 4 types of bill pay checklists anyone? I figure everyone doesn’t plan the same way so I’ve included all the styles of each type (e.g. bill pay checklists, budgets, spending trackers) that I created when experimenting with what planner pages worked best for me. With so many options you can pick which printables would best for YOU and your approach to budgeting and money management.
The kit has been expanded to include the following:
– Income
– Spending
– Budgeting
– Tax
– Debt
– Finance Calendars
– Savings
– Banking
– Investments
– Goals
– Dividers for Your Binder/Planner
There are multiple planning pages for different planning styles. For example, you may prefer to use calendars to track when bills are due, or you may prefer to see how much you’ve paid for all your bills for the entire year on the one page. The pages are designed to appeal to everyone so there will probably be more pages than you need. For example, try tracking your bills using one type of planner and if you find it’s not working for you, you can switch to one of the other layouts. Planner pages I felt needed more room are in landscape orientation, but I have also created portrait page orientation versions for those that prefer that page format.
I cannot show previews of all included pages as I have had people copying designs from some of my other planner sets. I’d just like to remind people that this is COPYRIGHT INFRINGEMENT and it is ILLEGAL. Ok, now that we’ve cleared that up, here is a list of everything that’s included!
INCLUDED IN THE BUDGET PLANNER
– Covers & spines – Budget Planner, Finances (4 pages)
– Optional Personalised Cover Page & Spine – please mention the wording you would like in the notes to seller when checking out e.g. Smith Family Budget Binder’, Dana’s Finances ect. (2 pages)
INCOME (1 Page)
– Income tracker – perfect if you have multiple income streams or just want to keep track of when you receive your paychecks and a running total of your income for the year. Can be used for any duration – daily, weekly, monthly, quarterly, semi-annually ect.
* Also refer to the budgeting section
SPENDING (30 pages)
– Recurring Expenses – Due Dates
– Fixed & Variable Expenses
– Payments (4 pages – 1 page per quarter)
– Payments with confirmation or cheque number
– 2 page expense anything – more detailed way to track spending for each category before recording into your monthly budget e.g. track how much you’re spending on groceries, fuel ect. – record each shop and then total for the week
– Upcoming expenses – record when major payments are due e.g. car registration, rates, taxes ect. so you can budget accordingly
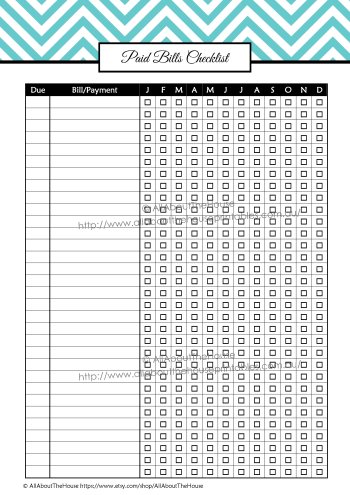
– Paid Bills Checklist v3 (landscape – 2 pages, 6 months per page) – record when bills are due, amount and a checkbox to tick when paid
– Paid Bills Checklist v5 – record due date and amounts paid each month (or quarterly ect.)
– Paid Bills Checklist – same as v5 but with an extra column to record the amount (if bills/payments are fixed amounts)
– Paid bills checklist (portrait page orientation) – tick off recurring bills of the same amount
– Online Payments
*Daily spending – Use the spending record which can be used for any duration – refer to ‘any duration spending’ section below. You can also use the finance calendar (refer to ‘monthly’ below). Also use the daily budget (refer to ‘budget’ below)
– Weekly Spending – 2 page spread (portrait page orientation) for recording each day’s spending including the amount, description, who it was paid to and budget category (to make transferring into your monthly budget easier). It also includes a weekly summary for recording any bills and debt payments you made, as well as investments, savings, income ect. You can also compare your totals with your daily and weekly budget.
– Weekly Payments Tracker – e.g. if you pay your rent weekly, car payments ect. – can be used for any expense
– Fortnightly Payments Tracker – same as above but for fortnightly payments
ANY DURATION SPENDING
– Spending record – can be used for any period or you can use one page per category
– Payments (2 page portrait page orientation) – if you want to keep all your payments in the same sheet, use this printable
– Spending tracker (with amount left to record if you are on track)
– Spending tracker v2 – same as above but with a notes section e.g. if you live in a share house and want to record who paid for those expenses – especially handy for e.g. grocery shopping
– Expenses – shared – 2 person
– Expenses – shared – 3 person – record the date the bill, rent or other expense is due and the amount then for each person record their contribution amount and the date they paid/gave it to the payer if the account is in one person’s name
– Spending tracker with payment method – keep track of your spending including payment method e.g. cash, credit card, cheque ect.
– Payments – can be used for bills, car loan, mortgage ect – see them all on the one page.
– Credit Card Balance Tracker – keep track of spending and payments on your credit card and compare against your credit card goals.
CALENDARS (28 pages)
– Perpetual finance calendar – with side column to check off payments and bills when paid throughout the month as well as a monthly summary i.e. total income, expenses, savings ect. (Monday and Sunday start versions – landscape page orientation – 2 pages)
– Perpetual finance calendar – same as above but with side column to record daily spending (Monday and Sunday start versions – landscape page orientation – 2 pages)
– Payments calendar – up to 3 payments/bills due can be checked off per day (landscape – perpetual – one page per month, both Monday and Sunday start version included – 24 pages total)
SAVINGS (3 pages)
– 52 week savings tracker – blank – you choose what amounts you can afford to contribute each week based on your budget
– Monthly savings tracker
– Savings Tracker – can be used for any duration – blank so you can record any amount you like
BUDGETS (27 pages)
– Paycheck budgeting
– Simple budget – income and expenses on the one page
– Daily Budget (landscape page orientation – 2 pages)
– Weekly budgeting – most simplified budget I have created for those who just want to see everything on the one page
– Monthly budget by week (one page, portrait) – print more pages as needed
– Monthly Budget – expenses categorised in addition to savings, investments ect. (5 pages)
– Monthly budget – same format as above but category headings are blank so you can add your own (5 pages)
– Quarterly Budget (8 pages – 2 pages for each quarter) – for each quarter – first page has income and expenses, 2nd page has only expenses
– Annual Finances Summary – copy your totals from your monthly budgets
– Annual Finances Summary v2 – (page 1 – same categories as the filled in 5 page monthly budget, page 2 – blank for you to add your own categories)
– Annual budget
DEBT (4 pages)
– Debt summary
– Debt Repayments Tracker – any period
– Credit card purchases
– Credit Card Balance – record all debits and credits on your credit card/s to determine your running account balance
* If you would like a monthly debt tracker I recommend using the ‘payments – 2 page’ (refer above)
BANKING (10 pages)
– Cheque Register – portrait
– Chequebook register – landscape
– Account register – record all transactions for each of your accounts (including deposits) – use one account per page
– Account Register v2 – same as above without the deposits column
– Credit card account info
– Account info
– Online payment login details
– Online Payments
– B-PAY account details (for Australians)
– BPAY Payments (for Australians)
TAX (3 pages)
– Tax
– Tax Deductions
– Donations Tracker
* If you would like to record weekly tax paid the 2 page record anything by week can be used for this purpose (see expenses section)
INVESTMENTS (2 pages)
– Investment analysis
– Share Performance
GOALS (2 pages)
– Financial Goals
– Financial Goals v2
– Lined note paper (1 page)
DIVIDERS TO USE THROUGHOUT YOUR BINDER/PLANNER:
– January – December Receipts (12 covers)
– January – December (12 covers)
– Bills to Pay, Paid Bills, Income, Expenses, Retirement Planning, Savings, Children’s Bank Accounts, College Fund, Financial Goals, Savings, Mortgage, Rent, Home Expenses, Education Expenses, Coupons, Debt, Banking, Tax, Tax Return, Tax Deductions, Cheque Book, Cash, Credit Card, Calendars, Spending, Weekly, Fortnightly, Monthly, Quarterly, Annual Summaries, Vehicles, Recurring payments, Donations, Insurances, Property Tax, Medical, Car Insurance, Home & Contents Insurance, Life Insurance, Family Trust, Miscellaneous, Phone, Utilities, Gas, Water, Electricity, Cable, Shopping, Subscriptions & Memberships, Gifts, Filing, His, Hers, Student Loans, Accounts, Investments, Shares, Clothing, Pets, Groceries, Entertainment, Healthcare, Personal Care, Transportation, Insurances, Superannuation, 401K, Goals (69 dividers/covers)
And here’s a more detailed explanation of suggested uses for each page and a preview of some of the included pages.
INCLUDED
– Covers & spines – Budgeting Planning, Budget Binder, Finance Binder, Finances
– Optional Personalised Cover Page & Spine – please mention the wording you would like in the notes to seller when checking out e.g. Smith Family Budget Binder’, Dana’s Finances ect.
INCOME
– Income tracker – perfect if you have multiple income streams or just want to keep track of when you receive your paychecks and a running total of your income for the year. Can be used for any duration – daily, weekly, monthly, quarterly, semi-annually ect.
![]()
* Also refer to the budgeting section
SPENDING
– Recurring Expenses – Due Dates – put this at the front of your binder or in front of your calendar when planning when you need to transfer funds/pay online. Can be used not only for bills but any recurring expense e.g. car payments, mortgage payments ect. . in notes you may put e.g. car registration renewed 26 apr frequency e.g. quarterly, annually, monthly, fortnightly ect. – I recommend using one per year, or notes may be this bill is split 50/50 if you are living in a share house. 2nd page has January to june and space to record when that expense was paid (e.g. either the date or a cross below the month)
![]()
![]()
– Fixed & Variable Expenses – use this per person, for the whole family, monthly, quarterly, annually ect. record fixed expenses in thenotes you may say recurring monthly or the monthly amount if you put the total amount in the amount column. Use monthly or annually recommended. See where you money is going nad how you can possibly cut back 0 good initial budgeting rool or review every year to see if spending is on track
– Payments (4 pages) – 1 page per quarter – record what the payment is for, when it is due, amount and confirmation number or cheque number
– Payments with confirmation, cheque or transaction number – use for bills, car repayments ect. in notes you might write automatic deduction – use one page for all expenses or use one page per type of expense e.g. one page for internet bills. In the notes you can record e.g. automatic deduction, whose account was used to pay the bill ect.
![]()
– 2 page expense anything
Need a more detailed way to track spending for each category before recording into your monthly budget? This page can be used to track how much you’re spending on groceries, fuel, clothes ect. e.g. then total each week’s spending to determine the total amount spent that month and transfer to one of the monthly budgets, or transfer it weekly if you do weekly budgeting.
If you have multiple incomes, these pages can also be used to record tax paid each week (or just leave the weekly columns blank and record the monthly amount in the total column), or, if you are self- employed, you can budget or record how much to set aside for tax each week, based on your earnings.
You could also use it as a savings goal tracker e.g. if you’re saving up for a car, a house, retirement planning, investments ect.
These pages can probably be used for many other ways, these are just a few suggestions! The best part about printables? Once purchased they’re yours to print endlessly for your PERSONAL USE so if you need more room to write just print another page/s.
![]()
![]()
– Upcoming expenses – record when major payments are due e.g. car registration, rates, taxes ect. so you can budget accordingly – write the date due in the smaller column and the expense in the larger column under each month. If you know how much each expense is going to cost, you may prefer the annual expenses page
![]()
– Paid Bills Checklist v3 (2 pages with 6 months per page) – space to record the date when each bill (or payment) is due, the bill amount for each month (can also be used for quarterly bills) with a box to check off when the bill has been paid.
![]()
– Paid bills checklist v.5 – this page is an updated version of the original paid bills checklist. It can be used for bills or any type of payment e.g. loan repayments.
![]()
– Paid Bills Checklist – Same as above but with an extra column to record the amount of the bill – good for fixed payments/bills such as your phone plan, rent ect.
– Online Payments
![]()
– BPAY Account Details – Handy reference page for my fellow Australian’s who use BPAY
![]()
– BPAY Payments
![]()
DAILY SPENDING – Refer to:
– The spending record which can be used for any duration – refer to the ‘any duration spending’ section below
– The the finance calendar with daily spending (refer to the ‘monthly’ section below)
– The daily budget – refer to the ‘budget’ section below
WEEKLY SPENDING
– Weekly Payments Tracker – e.g. if you pay your rent weekly, car payments ect. – can be used for any expense – also another method of recording mortgage payments and can also record additional payments you make through the year.
– Weekly Spending – 2 page spread (portrait page orientation – Sunday and Monday start versions included) for recording each day’s spending including the amount, description, who it was paid to and budget category (to make transferring into your monthly budget easier). It also includes a weekly summary for recording any bills and debt payments you made, as well as investments, savings, income ect. You can also compare your totals with your daily and weekly budget.
FORTNIGHTLY SPENDING
– Fortnightly Payments Tracker – same as above but for fortnightly payments.
MONTHLY SPENDING
– Monthly income and expenses – landscape (2 pages – 6 months on each page) – good for comparing expenses that occur each month e.g. groceries, fuel. Record the total for each category from each month’s budget here, before totaling again and transferring into your annual summary.
![]()
CALENDARS
Some of you like the monthly calendar with daily spending from the ‘simple planner’ series (no chevrons) finance kit. So I’ve added it back in.
– Perpetual Monthly finance calendar with daily spending (Monday and Sunday start versions – landscape page orientation – 2 pages)
![]()
– Perpetual finance calendar – with side columns to check off payments and bills when paid throughout the month as well as a monthly summary i.e. total income, expenses, savings ect. (Monday and Sunday start versions – landscape page orientation – 2 pages)
![]()
If you use calendars to track expenses, I find writing down not only when bills, repayments ect. are due, but also payday/s then working backwards from due dates to determine what days to pay bills or other expenses so they are paid on time and to ensure there will be enough in the account/s to pay the expense. When a payment is made, I also record the payment method e.g. ‘B’ for bank transfer, ‘CC’ for credit card, ‘C’ for cash ect. I made these alphabet stickers (I scaled them to 50% so they printed at 0.25 x 0.25″ instead of 0.5 x 0.5″) but you can also just type or write instead.
– Landscape calendars – perpetual (one page per calendar, both Monday and Sunday start version included – 24 pages) space to add days – up to 3 payments/bills due can be checked off per day
![]()
![]()
ANNUAL SPENDING
– Paid bills checklist (portrait page orientation) – tick off recurring bills of the same amount
– Paid bills checklistSame as above but landscape page orientation
– Annual expenses – similar to the ‘upcoming expenses’ page but spread over 2 pages (6 months per page) with an extra column to record the amount.
![]()
ANY DURATION SPENDING
– Spending record – can be used for any period e.g. monthly or weekly or you can use one page per category e.g. groceries
– Payments checklist – 2 page portrait spread – if you want to keep all your payments in the same sheet, I recommend using this printable. It can also be used for bills, car payments, loan repayments ect.
Record the frequency and the amount you budgeted for each bill. There is space to record the actual amount paid each month, quarter ect. As the year progresses, compare the actual amounts paid against the budgeted amount. Then use the average of the amounts paid (the notes column can be used to record this) to determine the amount to budget for next year, or review more frequently if need be.
The title box on the second page is blank so you can type in the year or month, type of payments (e.g. business or personal), expense category, duration e.g. January ect. If you fill up the page – the best part about these being printable is that you can print them as many times as you need, for your personal use!
![]()
![]()
– Spending tracker (with amount left to record if you are on track). There is space to write your category if you want to use one page for each type of expense e.g. food, housing ect. or there is space to record the duration the record is for if you prefer to combine all expenses on the one sheet
![]()
– Spending tracker v2 – same as above but with a notes section e.g. if you live in a share house and want to record who paid for those expenses – especially handy for e.g. grocery shopping
– Expenses – shared – 2 person – record the date the bill, rent or other expense is due and the amount then for each person, record their contribution amount and the date they paid/gave it to the payer if the account is in one person’s name
![]()
– Expenses – shared – 3 person – same as above but for three people (and no notes column)
– Spending tracker with payment method – keep track of your spending including payment method e.g. cash, credit card, cheque or savings account
– Payments – can be used for bills, car loan, mortgage ect – see them all on the one page.
– Credit Card Balance Tracker– keep track of spending and payments on your credit card and compare against your credit card goals. Summary of the credit card account helps compare if you have multiple credit card, which one to pay off sooner. Use one sheet per credit card that you have. Compare your goals to actual spending.
![]()
– Expenses – by income & account – Keep track of what expenses are paid by what account. Useful for couples wanting to keep their finances separate, keeping business and personal expenses separate ect.
![]()
SAVINGS
– 52 week savings tracker – blank – you choose what amounts you can afford to contribute each week based on your budget – use one sheet per person and record what duration – you don’t have to start the first week of jan or first week of a new financial year!
![]()
– Monthly savings tracker
![]()
– Savings Tracker – can be used for any duration – blank so you can record any amount you like use one page per week, month, quarterly, bi-annually, annually ect. whatever works best for you
![]()
BUDGETS
– Paycheck budgeting – record expenses paid by each paycheck for up to 2 paychecks. Can be used for any duration e.g. weekly, fortnightly, monthly ect.
![]()
– Simple budget – record income and expenses on the same page. There are no categories so it is perfect for those with more ‘simple’ finances (e.g. college students)
![]()
The second page can be printed as many times as needed if you have more expenses. This budget can be used for any duration e.g. weekly, fortnightly, monthly ect. Use one page for all expenses, or use one page for each type of expense.
![]()
DAILY BUDGETING
– Daily Budget – Landscape page format (2 pages) – record amount spent against each category for each day of the month then total the amounts spent each day for each category and transfer into your monthly budget. There is also space to record daily income.
The first page has days 1 to 16, the second has days 1 to 31 and a column to record the total for the month for each expense. The second page’s title box is blank if you want to include the month, year, ‘Mom’s Spending’ and print another page for ‘Dad’s Spending’ ect.
![]()
![]()
WEEKLY BUDGETING
– Weekly budgeting – For those who want to keep it simple and see everything on the one page – record income, payments (bills, loan repayments ect.) for each week (write the day on the small line, check off when the payment has been made, describe the payment on the longer line and the amount on the right). Each day you can record spending – describe the transaction in the larger space underneath each day and the amount in the space on the right, then total everything and record in the summary section. You can then transfer the total for each week to your monthly budget.
![]()
– Weekly Budget – Income & Expenses for each day on the one page, then total at the end of the week
– Weekly Budget – Monthly budget by week (one page, portrait) – print more pages as needed
MONTHLY BUDGETING
– Budget – Categorised – Filled in (5 pages plus 1 blank page to add your own category or print multiple pages and add multiple categories). This budget is an updated version of the budget that was included in the original finance binder, based on customer feedback.
This budget can be use for any duration – weekly, fortnightly, monthly ect. The title box on each page is editable so you can type in the month, week or dates the budget is for (or just type e.g. ‘Our Family Budget’ ‘2015 Budget’ or whatever wording you like)
‘Filled in’ means expenses are categorised (refer to the image below) e.g. food, housing, education, clothing, healthcare ect. There is also a section for recording savings, investments ect. Each category has space to record subtotals and on the last page is a summary (monthly income, expenses, end of period’s balance, last period’s balance, running total for the year) so you can compare how your budget is progressing throughout the year.
Note: The number of lines for each category varies. I have allocated e.g. more space/lines to utilities for example, than clothing
![]()
![]()
– Budget – Categorised – Blank – same as above but the categories are removed so you can type in your own
![]()
– Monthly budget – 2 pages – same format as above but category headings are blank so you can add your own
QUARTERLY BUDGETING
A lot of you preferred the option for quarterly budgeting from the non-chevron original finance set so a new and improved version is included:
– Quarterly Budget (8 pages – 2 pages for each quarter) – for each quarter – first page has income and expenses, 2nd page has only expenses – page can be printed as many times as you need. If you don’t need the whole kit, it can be purchased separately HERE.
![]()
![]()
![]()
ANNUAL BUDGETING
– Annual budget – best used at the start of the year. Total each expense from your monthly budget or estimate and use as a guide when calculating your monthly budgets. Can also be used standalone if you don’t want to budget weekly, fortnightly, monthly ect.
– Annual Finances Summary – copy your totals from the monthly spending summary page
– Annual Finances Summary v2 – record income, expenses, savings, debt, investments and end of month balance for all 12 months on the one page
![]()
DEBT
– Debt summary – record details of all type of debt you owe, compare them and work out a strategy for prioritising which debts to pay off first, how much to pay off each month ect.
![]()
– Debt Tracker – an updated version of the debt tracker from the original chevron finance binder
![]()
– Debt Tracker – any period – record payments when due and when paid, you can also record any additional payments you made
– Credit card purchases – record all purchases you make on your credit card, including the date so you know when to pay them off to avoid paying interest, also space to record where you have actually paid for the purchase
– Credit Card Balance – record all debits and credits on your credit card/s to determine your running account balance
Debt Tracker – if you would like a monthly debt tracker I recommend using monthly using the ‘payments – 2 page spread’
BANKING
– Chequebook register
![]()
– Account register – record all transactions for each of your accounts – use one account per page
![]()
– Account Register v2 – similar to above but if you want more room to record details of the transaction and don’t want separate deposit and withdrawal columns
![]()
– Credit card account info – in the notes section I record things like ‘business credit card’ or ‘travel card’ and cross-currency conversion fees (I live in Australia and pre-convert AUD to USD then use when shopping online), you might also like to note if it is the card you use to buy groceries, or pay this off by the 15th of every month, primary credit card, backup card, the interest free period ect. Or, if I had a credit card provided by a company that offers loyalty points for every purchase you make e.g. Qantas, I would record spend $___ and get ___ bonus points ect.
– Account info
– Online payment details – record usernames, passwords, account numbers , date payments are due ect. for online payments that you make (e.g. utilities). There is a notes section to record e.g. if it is set up for automatically deduct the amount from your credit card or bank account each month.
TAX
– Tax – record your income and deductions to determine your after tax income
– Tax Deductions – keep a running list throughout the year of items to claim on – perfect if you’re claim a lot such as if you have a business
![]()
– Donations Tracker – use one page per year or print multiple for each year
![]()
* If you would like to record weekly tax paid the 2 page record anything by week can be used for this purpose (see expenses section)
INVESTMENTS
Investment analysis – use this worksheet to analyse investments and choose which one is right for you e.g. property, shares, term deposit ect. – there is space to record details about the investment including expected return, risk level, minimum deposit and conditions (e.g. payment due in 30 days) and upfront costs. Assess the investment based on the expected return and costs on a weekly, fortnightly, quarterly, semi-annually and/or annual basis to determine expected profit or loss (P/L). There is additional note space if you need to write further details about the investment.
Share Performance – for those that invest in shares, keep track of how many shares you have in different companies. Each time you purchase shares in the company, record the purchase date, qty, price paid per share, sale price, sale date and profit or loss. There is also space to record dividends, and a notes section to write anything you like – this will help you compare which shares are profitable as well as when to sell to ensure you earn a profit.
![]()
GOALS
– Financial Goals – See all your short, medium and long term goals on the one page. This is an updated version of the financial goals page from the original chevron finance binder.
– Financial Goals v2 – you can track your progress using the 52 week savings tracker – first page has suggested categories, second page there are no categories so you can type in/choose your own (2 pages total)
![]()
And as is included in all of the planner sets – lined note paper
![]()
DIVIDERS TO USE THROUGHOUT YOUR BINDER/PLANNER:
Bills to Pay & Paid Bills, Income, Expenses, Retirement Planning, Savings, Children’s Bank Accounts, College Fund, Financial Goals, Savings, Mortgage, Rent, Home Expenses, Education Expenses, Coupons, Debt, Banking, Tax, Tax Return, Tax Deductions, Cheque Book, Cash, Credit Card, Calendars, Spending, Weekly, Fortnightly, Monthly, Quarterly, Annual Summaries, Vehicles, Recurring payments, Donations, Insurances, Property Tax, Medical, Car Insurance, Home & Contents Insurance, Life Insurance, Family Trust, Entertainment, Miscellaneous, Phone, Utilities, Gas, Water, Electricity, Cable, Groceries, Shopping, Subscriptions (use for magazines, blumbox ect.), Gifts, Filing, His, Hers (if you keep you and your partners’ finances separate), Student Loans, Accounts, Investments, Shares, Superannuation, 401K
![]()
… So, in summary, here is a list of all the pages now included in the updated and expanded finance/budget binder:
INCLUDED IN THE BUDGET PLANNER
– Covers & spines – Budget Planner, Finances (4 pages)
– Optional Personalised Cover Page & Spine – please mention the wording you would like in the notes to seller when checking out e.g. Smith Family Budget Binder’, Dana’s Finances ect. (2 pages)
INCOME (1 Page)
– Income tracker – perfect if you have multiple income streams or just want to keep track of when you receive your paychecks and a running total of your income for the year. Can be used for any duration – daily, weekly, monthly, quarterly, semi-annually ect.
* Also refer to the budgeting section
SPENDING (30 pages)
– Recurring Expenses – Due Dates
– Fixed & Variable Expenses
– Payments (4 pages – 1 page per quarter)
– Payments with confirmation or cheque number
– 2 page expense anything – more detailed way to track spending for each category before recording into your monthly budget e.g. track how much you’re spending on groceries, fuel ect. – record each shop and then total for the week
– Upcoming expenses – record when major payments are due e.g. car registration, rates, taxes ect. so you can budget accordingly
– Paid Bills Checklist v3 (landscape – 2 pages, 6 months per page) – record when bills are due, amount and a checkbox to tick when paid
– Paid Bills Checklist v5 – record due date and amounts paid each month (or quarterly ect.)
– Paid Bills Checklist – same as v5 but with an extra column to record the amount (if bills/payments are fixed amounts)
– Paid bills checklist (portrait page orientation) – tick off recurring bills of the same amount
– Online Payments
*Daily spending – Use the spending record which can be used for any duration – refer to ‘any duration spending’ section below. You can also use the finance calendar (refer to ‘monthly’ below). Also use the daily budget (refer to ‘budget’ below)
– Weekly Spending – 2 page spread (portrait page orientation) for recording each day’s spending including the amount, description, who it was paid to and budget category (to make transferring into your monthly budget easier). It also includes a weekly summary for recording any bills and debt payments you made, as well as investments, savings, income ect. You can also compare your totals with your daily and weekly budget.
– Weekly Payments Tracker – e.g. if you pay your rent weekly, car payments ect. – can be used for any expense
– Fortnightly Payments Tracker – same as above but for fortnightly payments
ANY DURATION SPENDING
– Spending record – can be used for any period or you can use one page per category
– Payments (2 page portrait page orientation) – if you want to keep all your payments in the same sheet, use this printable
– Spending tracker (with amount left to record if you are on track)
– Spending tracker v2 – same as above but with a notes section e.g. if you live in a share house and want to record who paid for those expenses – especially handy for e.g. grocery shopping
– Expenses – shared – 2 person
– Expenses – shared – 3 person – record the date the bill, rent or other expense is due and the amount then for each person record their contribution amount and the date they paid/gave it to the payer if the account is in one person’s name
– Spending tracker with payment method – keep track of your spending including payment method e.g. cash, credit card, cheque ect.
– Payments – can be used for bills, car loan, mortgage ect – see them all on the one page.
– Credit Card Balance Tracker – keep track of spending and payments on your credit card and compare against your credit card goals.
CALENDARS (28 pages)
– Perpetual finance calendar – with side column to check off payments and bills when paid throughout the month as well as a monthly summary i.e. total income, expenses, savings ect. (Monday and Sunday start versions – landscape page orientation – 2 pages)
– Perpetual finance calendar – same as above but with side column to record daily spending (Monday and Sunday start versions – landscape page orientation – 2 pages)
– Payments calendar – up to 3 payments/bills due can be checked off per day (landscape – perpetual – one page per month, both Monday and Sunday start version included – 24 pages total)
SAVINGS (3 pages)
– 52 week savings tracker – blank – you choose what amounts you can afford to contribute each week based on your budget
– Monthly savings tracker
– Savings Tracker – can be used for any duration – blank so you can record any amount you like
BUDGETS (27 pages)
– Paycheck budgeting
– Simple budget – income and expenses on the one page
– Daily Budget (landscape page orientation – 2 pages)
– Weekly budgeting – most simplified budget I have created for those who just want to see everything on the one page
– Monthly budget by week (one page, portrait) – print more pages as needed
– Monthly Budget – expenses categorised in addition to savings, investments ect. (5 pages)
– Monthly budget – same format as above but category headings are blank so you can add your own (5 pages)
– Quarterly Budget (8 pages – 2 pages for each quarter) – for each quarter – first page has income and expenses, 2nd page has only expenses
– Annual Finances Summary – copy your totals from your monthly budgets
– Annual Finances Summary v2 – (page 1 – same categories as the filled in 5 page monthly budget, page 2 – blank for you to add your own categories)
– Annual budget
DEBT (4 pages)
– Debt summary
– Debt Repayments Tracker – any period
– Credit card purchases
– Credit Card Balance – record all debits and credits on your credit card/s to determine your running account balance
* If you would like a monthly debt tracker I recommend using the ‘payments – 2 page’ (refer above)
BANKING (10 pages)
– Cheque Register – portrait
– Chequebook register – landscape
– Account register – record all transactions for each of your accounts (including deposits) – use one account per page
– Account Register v2 – same as above without the deposits column
– Credit card account info
– Account info
– Online payment login details
– Online Payments
– B-PAY account details (for Australians)
– BPAY Payments (for Australians)
TAX (3 pages)
– Tax
– Tax Deductions
– Donations Tracker
* If you would like to record weekly tax paid the 2 page record anything by week can be used for this purpose (see expenses section)
INVESTMENTS (2 pages)
– Investment analysis
– Share Performance
GOALS (2 pages)
– Financial Goals
– Financial Goals v2
– Lined note paper (1 page)
DIVIDERS TO USE THROUGHOUT YOUR BINDER/PLANNER:
– January – December Receipts (12 covers)
– January – December (12 covers)
– Bills to Pay, Paid Bills, Income, Expenses, Retirement Planning, Savings, Children’s Bank Accounts, College Fund, Financial Goals, Savings, Mortgage, Rent, Home Expenses, Education Expenses, Coupons, Debt, Banking, Tax, Tax Return, Tax Deductions, Cheque Book, Cash, Credit Card, Calendars, Spending, Weekly, Fortnightly, Monthly, Quarterly, Annual Summaries, Vehicles, Recurring payments, Donations, Insurances, Property Tax, Medical, Car Insurance, Home & Contents Insurance, Life Insurance, Family Trust, Miscellaneous, Phone, Utilities, Gas, Water, Electricity, Cable, Shopping, Subscriptions & Memberships, Gifts, Filing, His, Hers, Student Loans, Accounts, Investments, Shares, Clothing, Pets, Groceries, Entertainment, Healthcare, Personal Care, Transportation, Insurances, Superannuation, 401K, Goals (69 dividers/covers)
All pages are editable except the covers and dividers. What does Editable mean?…
EDITABLE DOCUMENTS
– When you open the file there will be light blue boxes where you can type in your information (this will NOT remain light blue when printed)
– You can still print and hand-write on the sheets (the blue boxes won’t appear on your printed copy)
– The fillable font is helvetica in black
– The checkboxes are not editable. The sheets are intended for filling out on your computer and checking off by hand
– The covers, dividers and spines are not editable
– For copyright protection, the layout of the documents, including existing text cannot be changed
If you’re feeling a little overwhelmed and not sure where to start I would make a list of all the things you need to keep track of e.g. bills on a monthly basis, spending on a weekly basis, fortnightly paydays, weekly savings, annual financial goals, budgeting on a monthly basis ect. which will help you narrow down which pages you need.
Using the dividers
Depending on how much paperwork/how big your household is, you may need more than one binder or notebook. Some dividers may actually be ‘covers’. I recommend the following:
– Store receipts in a separate binder and within that binder by category e.g. groceries, gifts, ect.
– One binder for insurances – life, health, car ect.
– One for bills – water, electricity, gas, cable
– Keep business income and spending separate to your family’s income
– Keep tax documents separate – and use the ‘his’ and ‘hers’ dividers
– Keep investments separate
– Keep retirement fund separate
Assembling your Planner
I recommend the:
– Arc Notebook system or Levenger (allows you to remove and rearrange pages as often as you like)
– 3 ring binders
– Mini binders (the pages are full size, for half size printing instructions, please see this post)
– Coil, spiral or comb binding
– Filofax
– If you use the Erin Condren or Plum Paper Planners – you can print the pages at that size. please see this post for instructions.
I was previously using a 3 ring binder but found it was too bulky. I have since switched to the Arc Notebook. I use the A4 version as I live in Australia – it can be purchased from Staples.com.au (Staples often do discounts around back to school time. I think they also give you a voucher when you sign up). For USA readers, Staples.com stocks the letter size version. You can also get half size and A5 size versions. I have purchased both the poly and leather versions and much prefer the leather which costs more but is more sturdier and will last longer. The leather also comes in a range of colours: black, pink, blue and green. No I am not a spokesperson for the Arc system – I just really like the product!
What Pages Do I use?
I do not use all the pages. The pages are designed to appeal to everyone. Over the past 2 years I have been tweaking my budget/finance binder switching out and updating layouts of planner pages until I have found a system that works for me. For example, I do not do a daily budget but I do keep weekly, monthly and annual budgets. I do not budget by quarter but I have had customer requests for quarterly budget planners so I have created and added those to this set. There are plenty of options for any budgeting style as I think it is important that YOU choose which pages will work best for YOU otherwise you won’t use them!
Printing the Pages
The pages are A4 size. They can be printed at letter size, half size, A5, junior arc size, Filofax, personal size, Erin Condren planner size or any other size you like – please see this blog post for printing instructions and tips. For sheets with 1 page e.g. chequebook register, there are 2 copies of the same page in the PDF file if you would like to do duplex printing or ‘2 page page’ printing then cut the sheets in half for half size pages. You can also do duplex printing for those with multiple pages e.g. the categorised budget. Please see this blog post for printing instructions.
Upgrade Information
If you have previously purchased this set (either just the finance set or a bundle containing the original finance set such as the ‘Get it All’ bundle, Direct Sales Planner bundle ect.) contact me at allaboutthehouseetsy@yahoo.com.au or via Etsy with your order number and email address and I will set up a custom listing for the upgrade (cost is $8AUD). See here to convert this amount into your currency.
Do you think these planner pages will work for you?
If you are eager to start budgeting (said no one ever!), you can purchase this planner via these links:
Online Store: Light blue, dark blue, pink, purple, green, black, grey
Etsy: Light blue, dark blue, pink, purple, green, black, grey
Don’t need the whole set? Some of the popular planner pages are available individually in the online store so you can create your own kit.
The original finance set can be purchased through the Online Store and Etsy, as well as the non-chevron version: Online Store, Etsy.
All 7 colours will be available for purchase shortly if you can’t decide on a colour, want to mix and match or use the printables e.g. for your family (one colour) and home business use (a different colour).
If you think there is something STILL missing comment below and I may make it available as a freebie 🙂
If you like to try a free coordinating printable. This paid bills checklist is available as a FREE (for personal use only) download here. Just checkout as though you are making a ‘purchase’ – you will not actually have to pay anything.
I have been considering add a red version to the chevron planner series – what do you think?
COPYRIGHT
All printables are (c) AllAboutTheHouse Printables. They may not be copied, resold, shared, given away, distributed, made available for free on your blog ect. They are for the purchasers PERSONAL USE ONLY. Copying these designs is COPYRIGHT INFRINGEMENT and it is ILLEGAL.
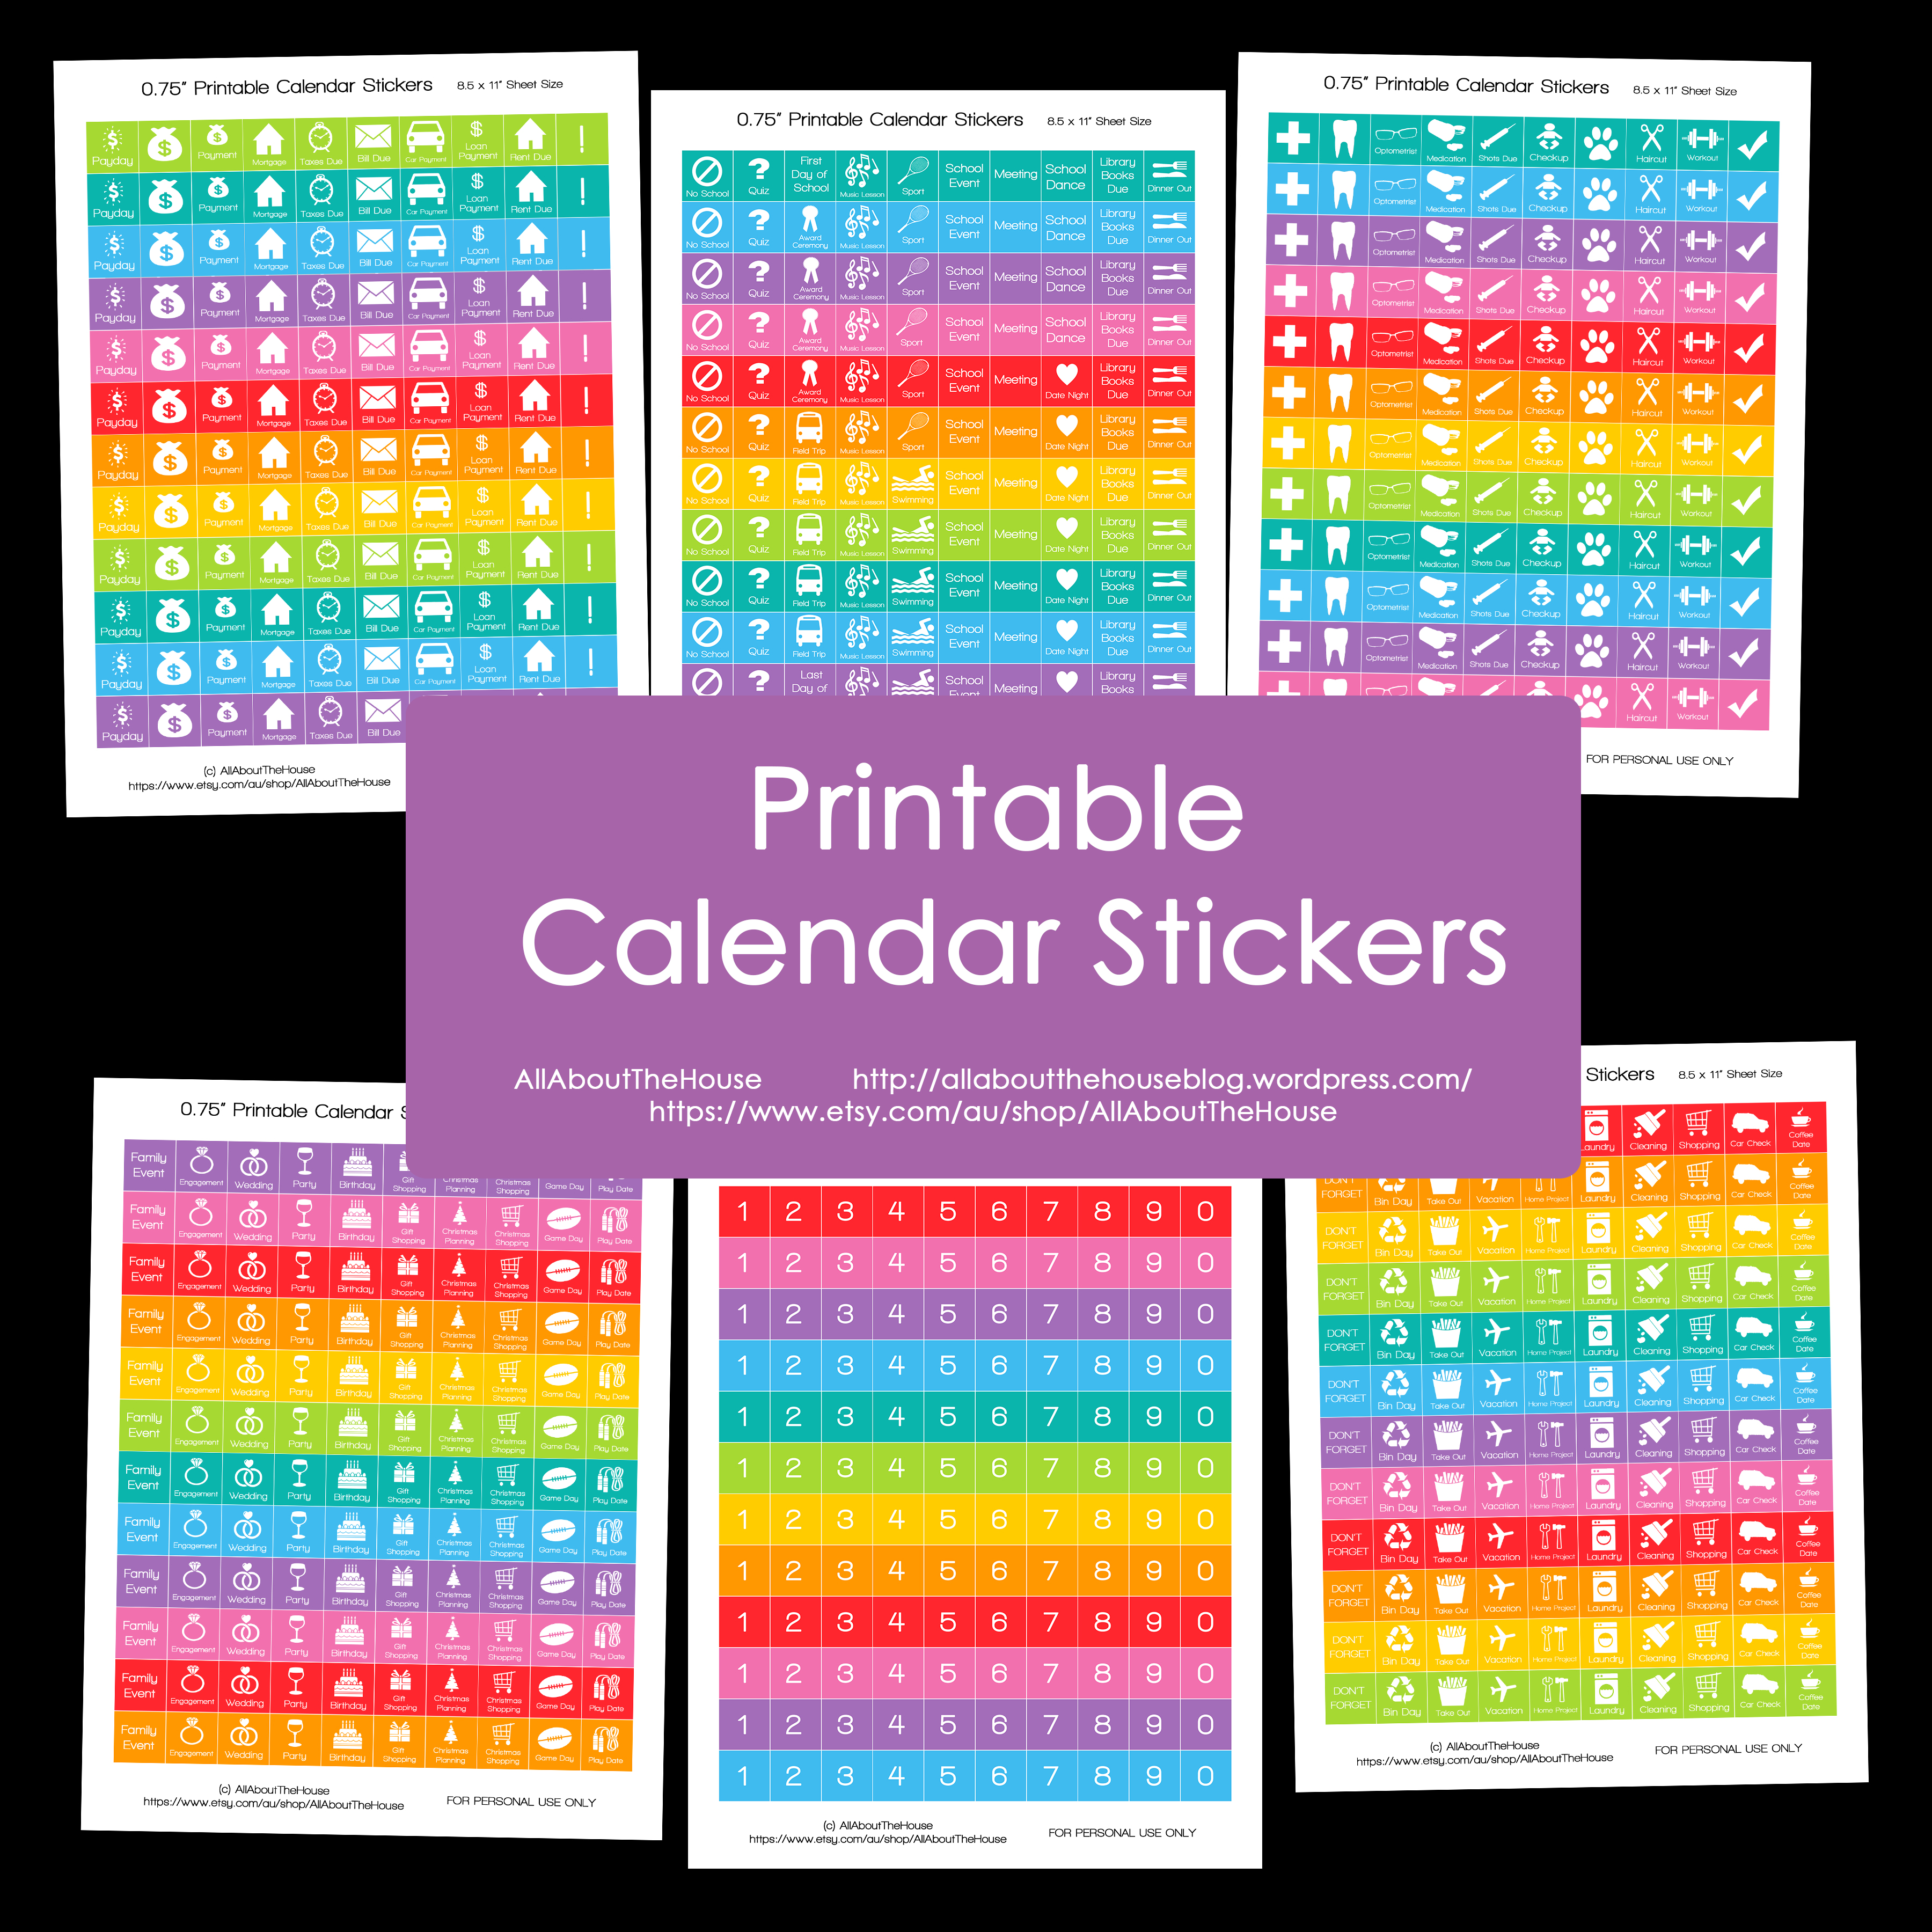
Today’s post is for all you die-hard Erin Condren fans! You guys loved my calendar stickers so I’ve made stickers that are especially designed to fit the Erin Condren Life Planner! (They can also be used for other planners such as plum paper and my 2015 printable planners)
And for those of you who have asked for a smaller size for the other calendar stickers, please see this post which has helpful screenshots on how to change the page scaling (e.g. 100% to 50% will make them 0.375″in size.
UPDATE: New half inch (0.5″) square stickers are also available with each sheet featuring a different icon e.g. gas pump, dollar sign, laundry, trash can ect. Visit my Etsy store, AllAboutTheHouse for the full range. More stickers have also been added including triangle corner stickers, ECLP full box, daily sidebar and checklist stickers for the ECLP Horizontal version, flag stickers and much more!
These templates and designs take a long time to make and I have priced them affordably so you can add a special personalized touch to your planner without breaking your bank. Please do not abuse this and respect the time it takes to create these designs. These files are strictly for PERSONAL USE ONLY.
So, here are the newest stickers!
Morning/Day/Night Sections (but can be used in other sections of the planner – or in any planner) – The stickers are close together on the template making it easier if you are cutting them by hand or using a guillotine (which I recommend) or paper trimmer.


Full Box stickers for the white spaces underneath the Morning/Day/Night titles
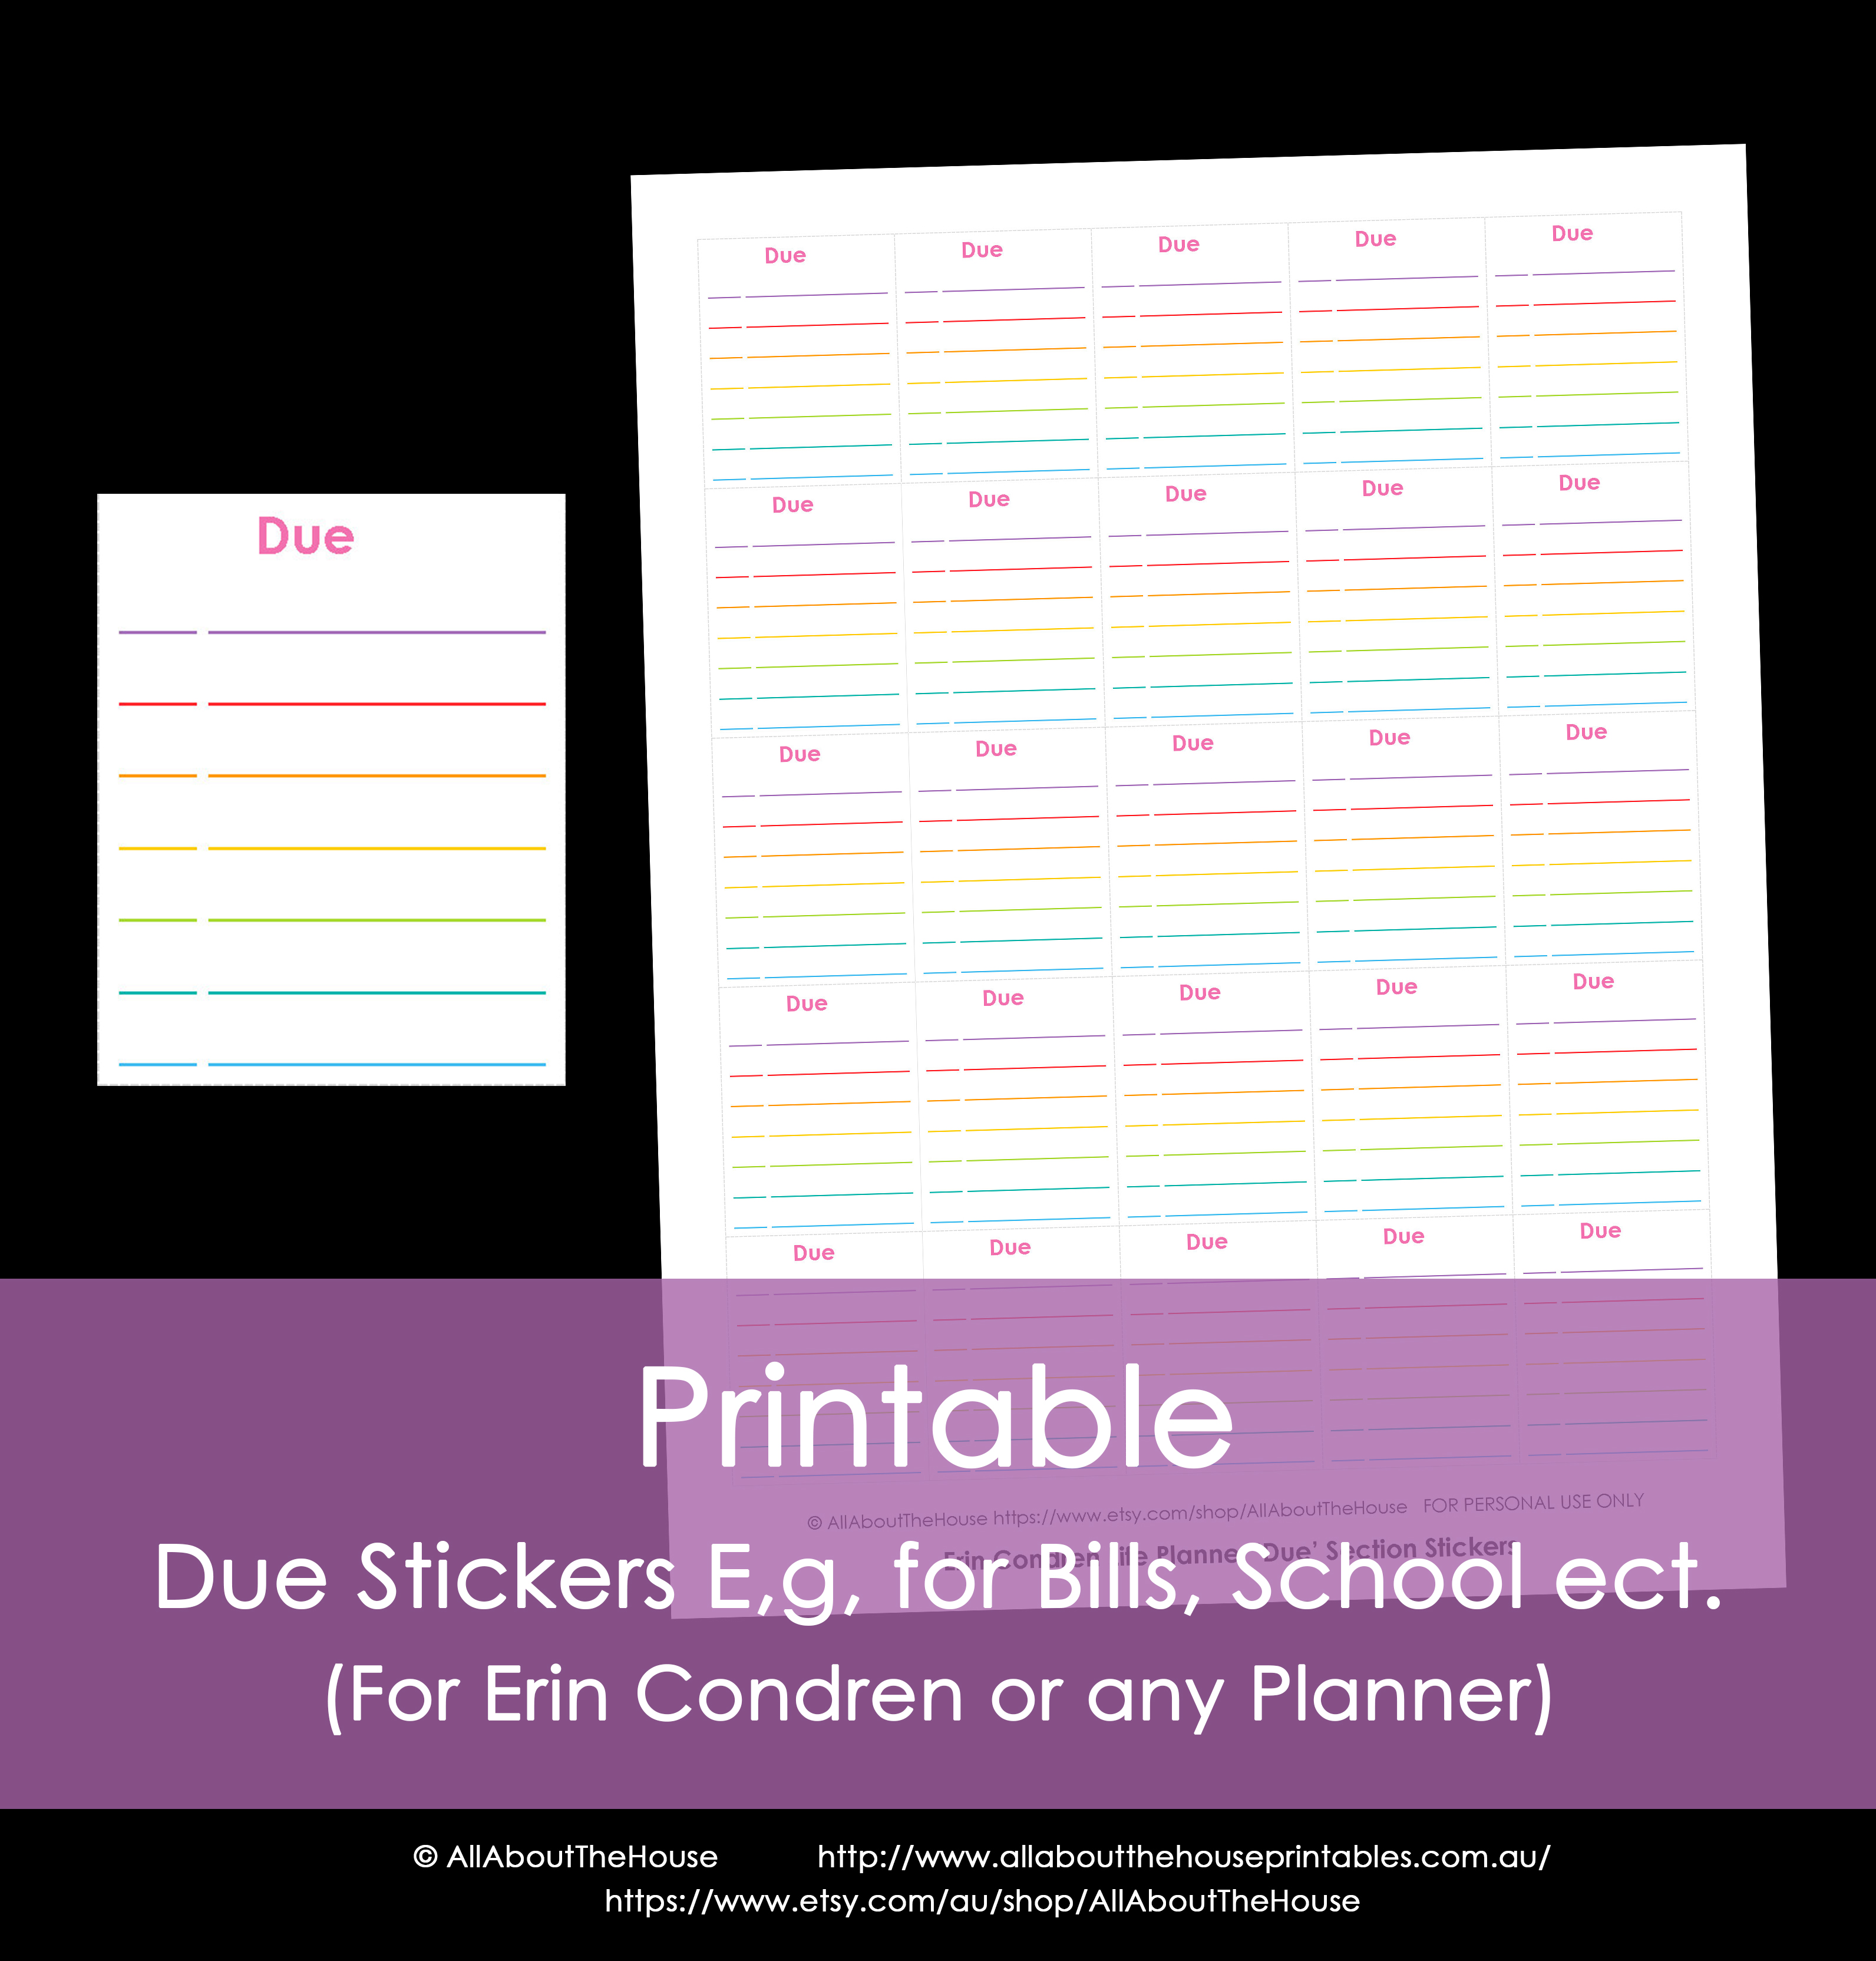
Due Stickers – for school assessment due dates, bills to be paid, goals, to do’s ect. (they can be used daily, weekly or even monthly – whatever works best for you)
Tick List Stickers – can be used for to do lists, chores, goals, homework, work tasks, blogging to dos, bills to pay ect.

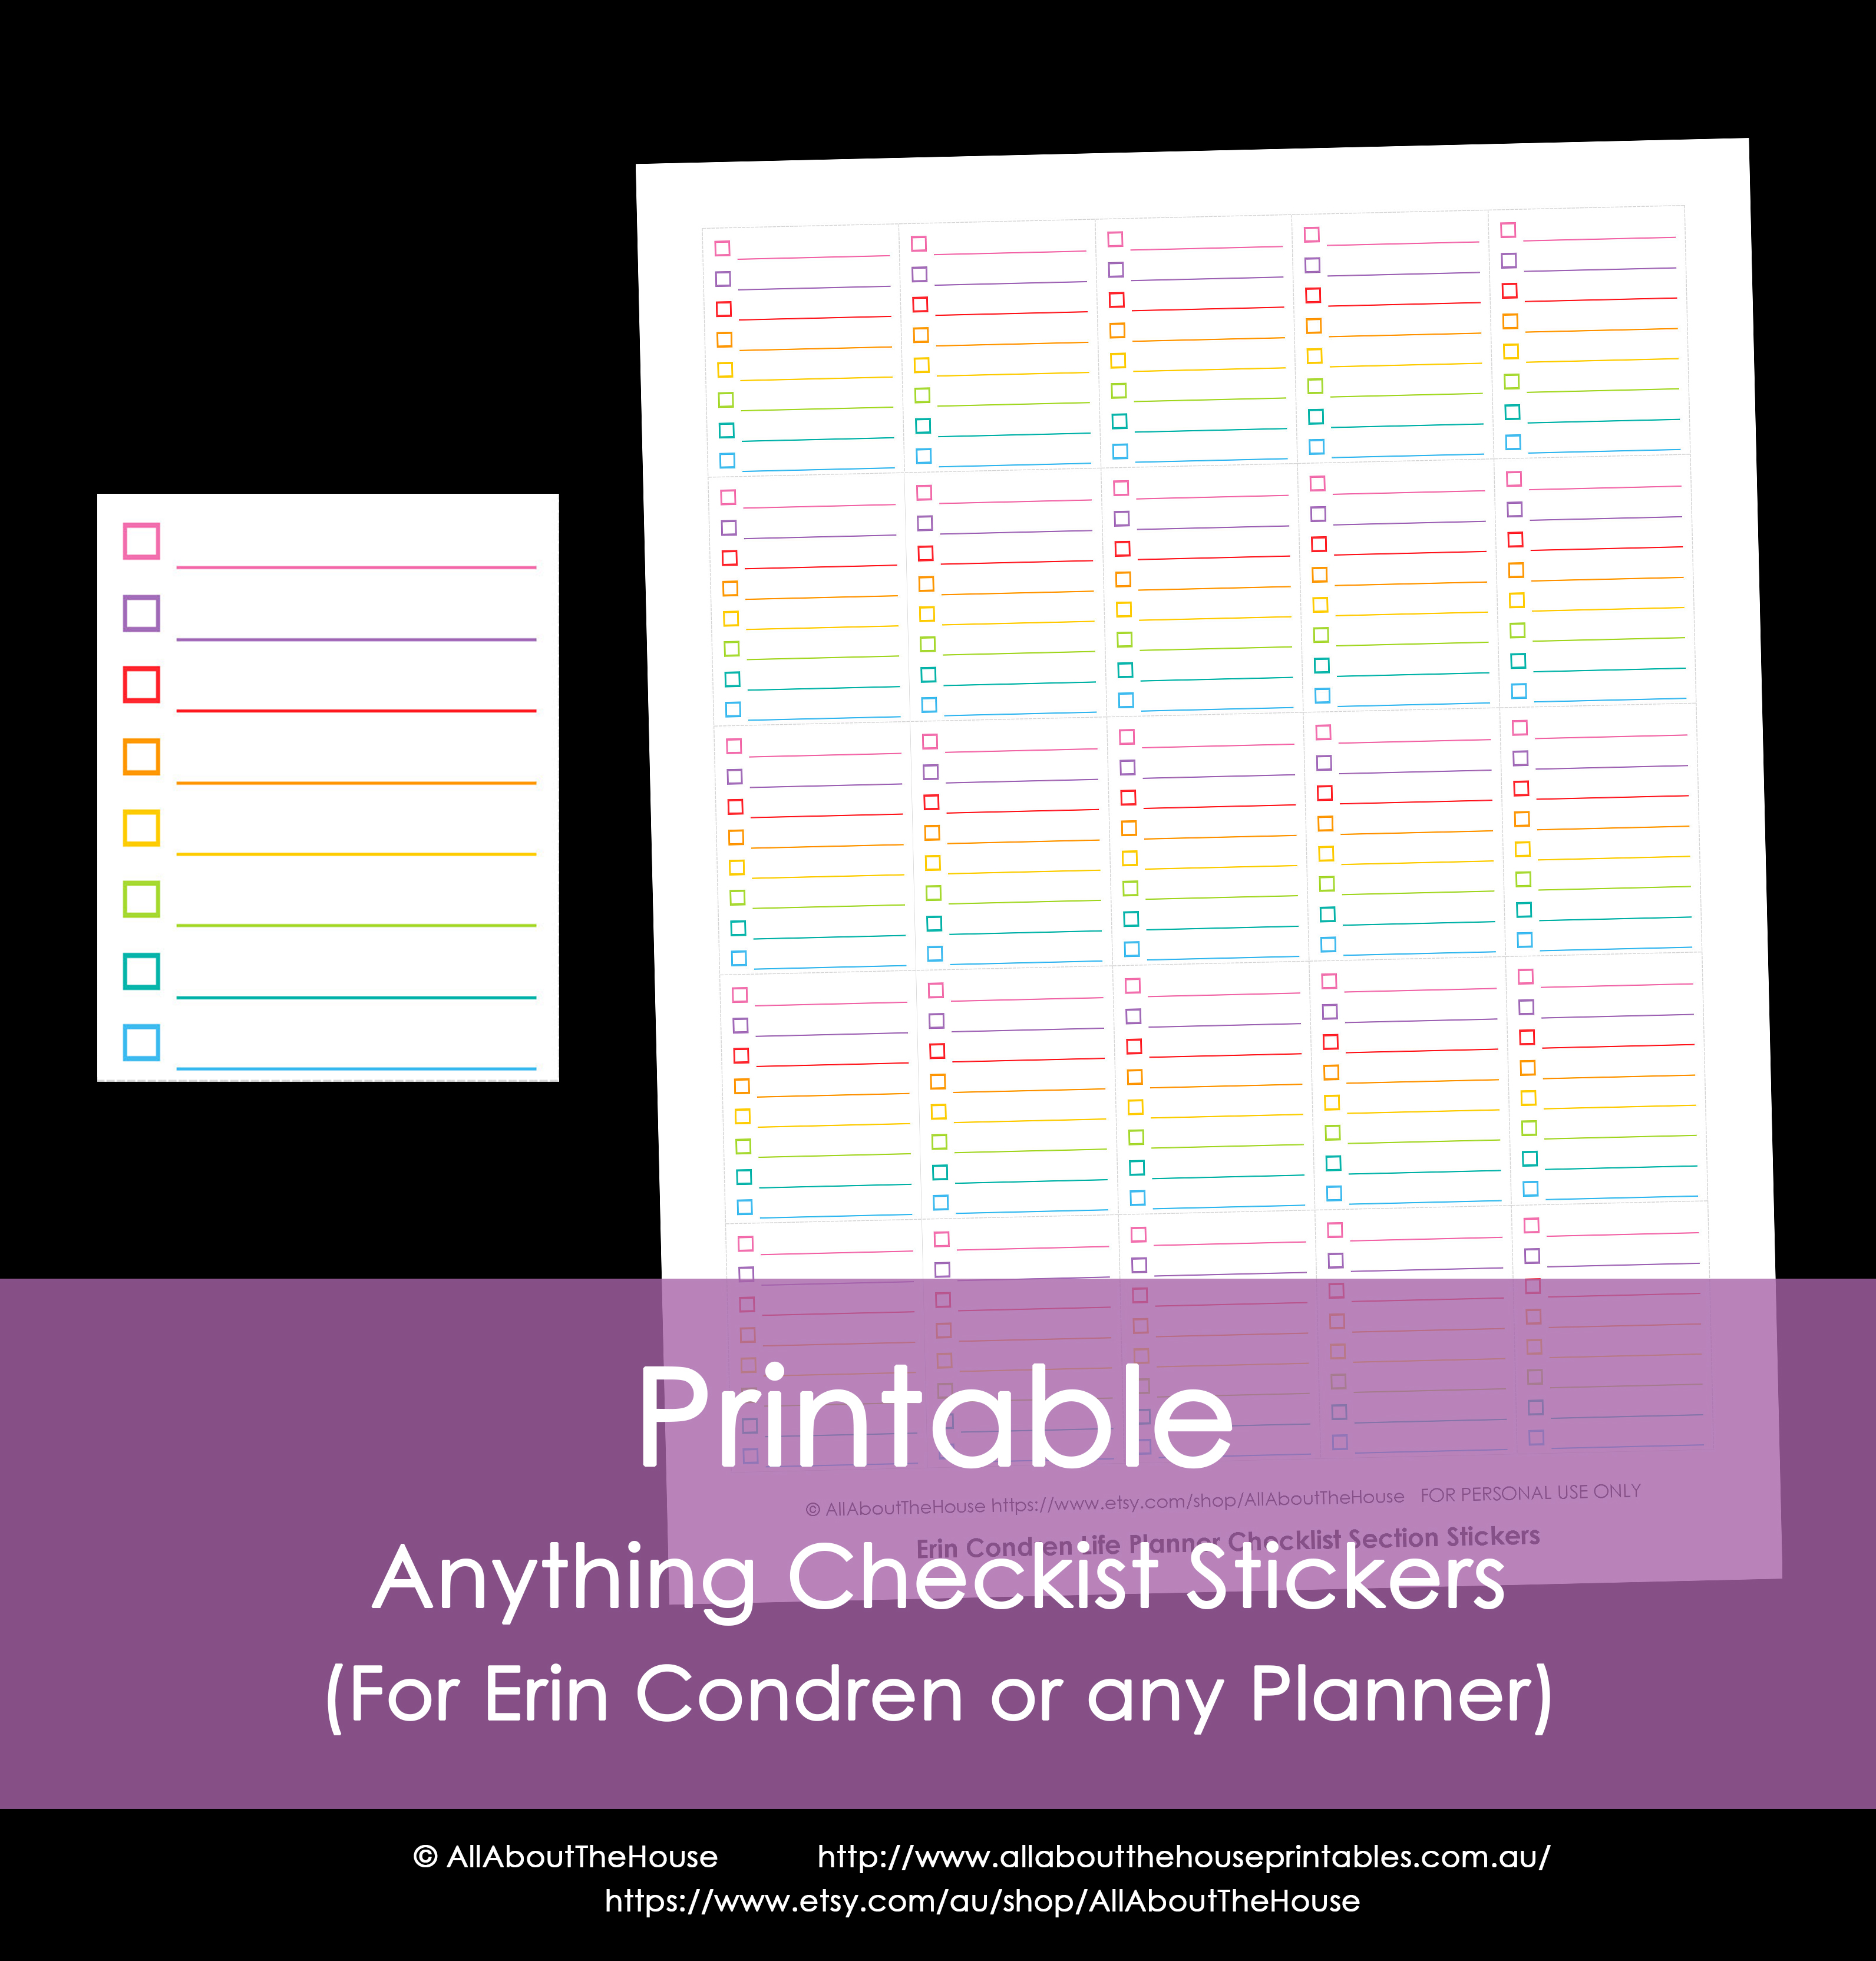
Checklist stickers – use for to do lists, chores, goals, homework, work tasks, blogging to dos, bills to be paid ect.
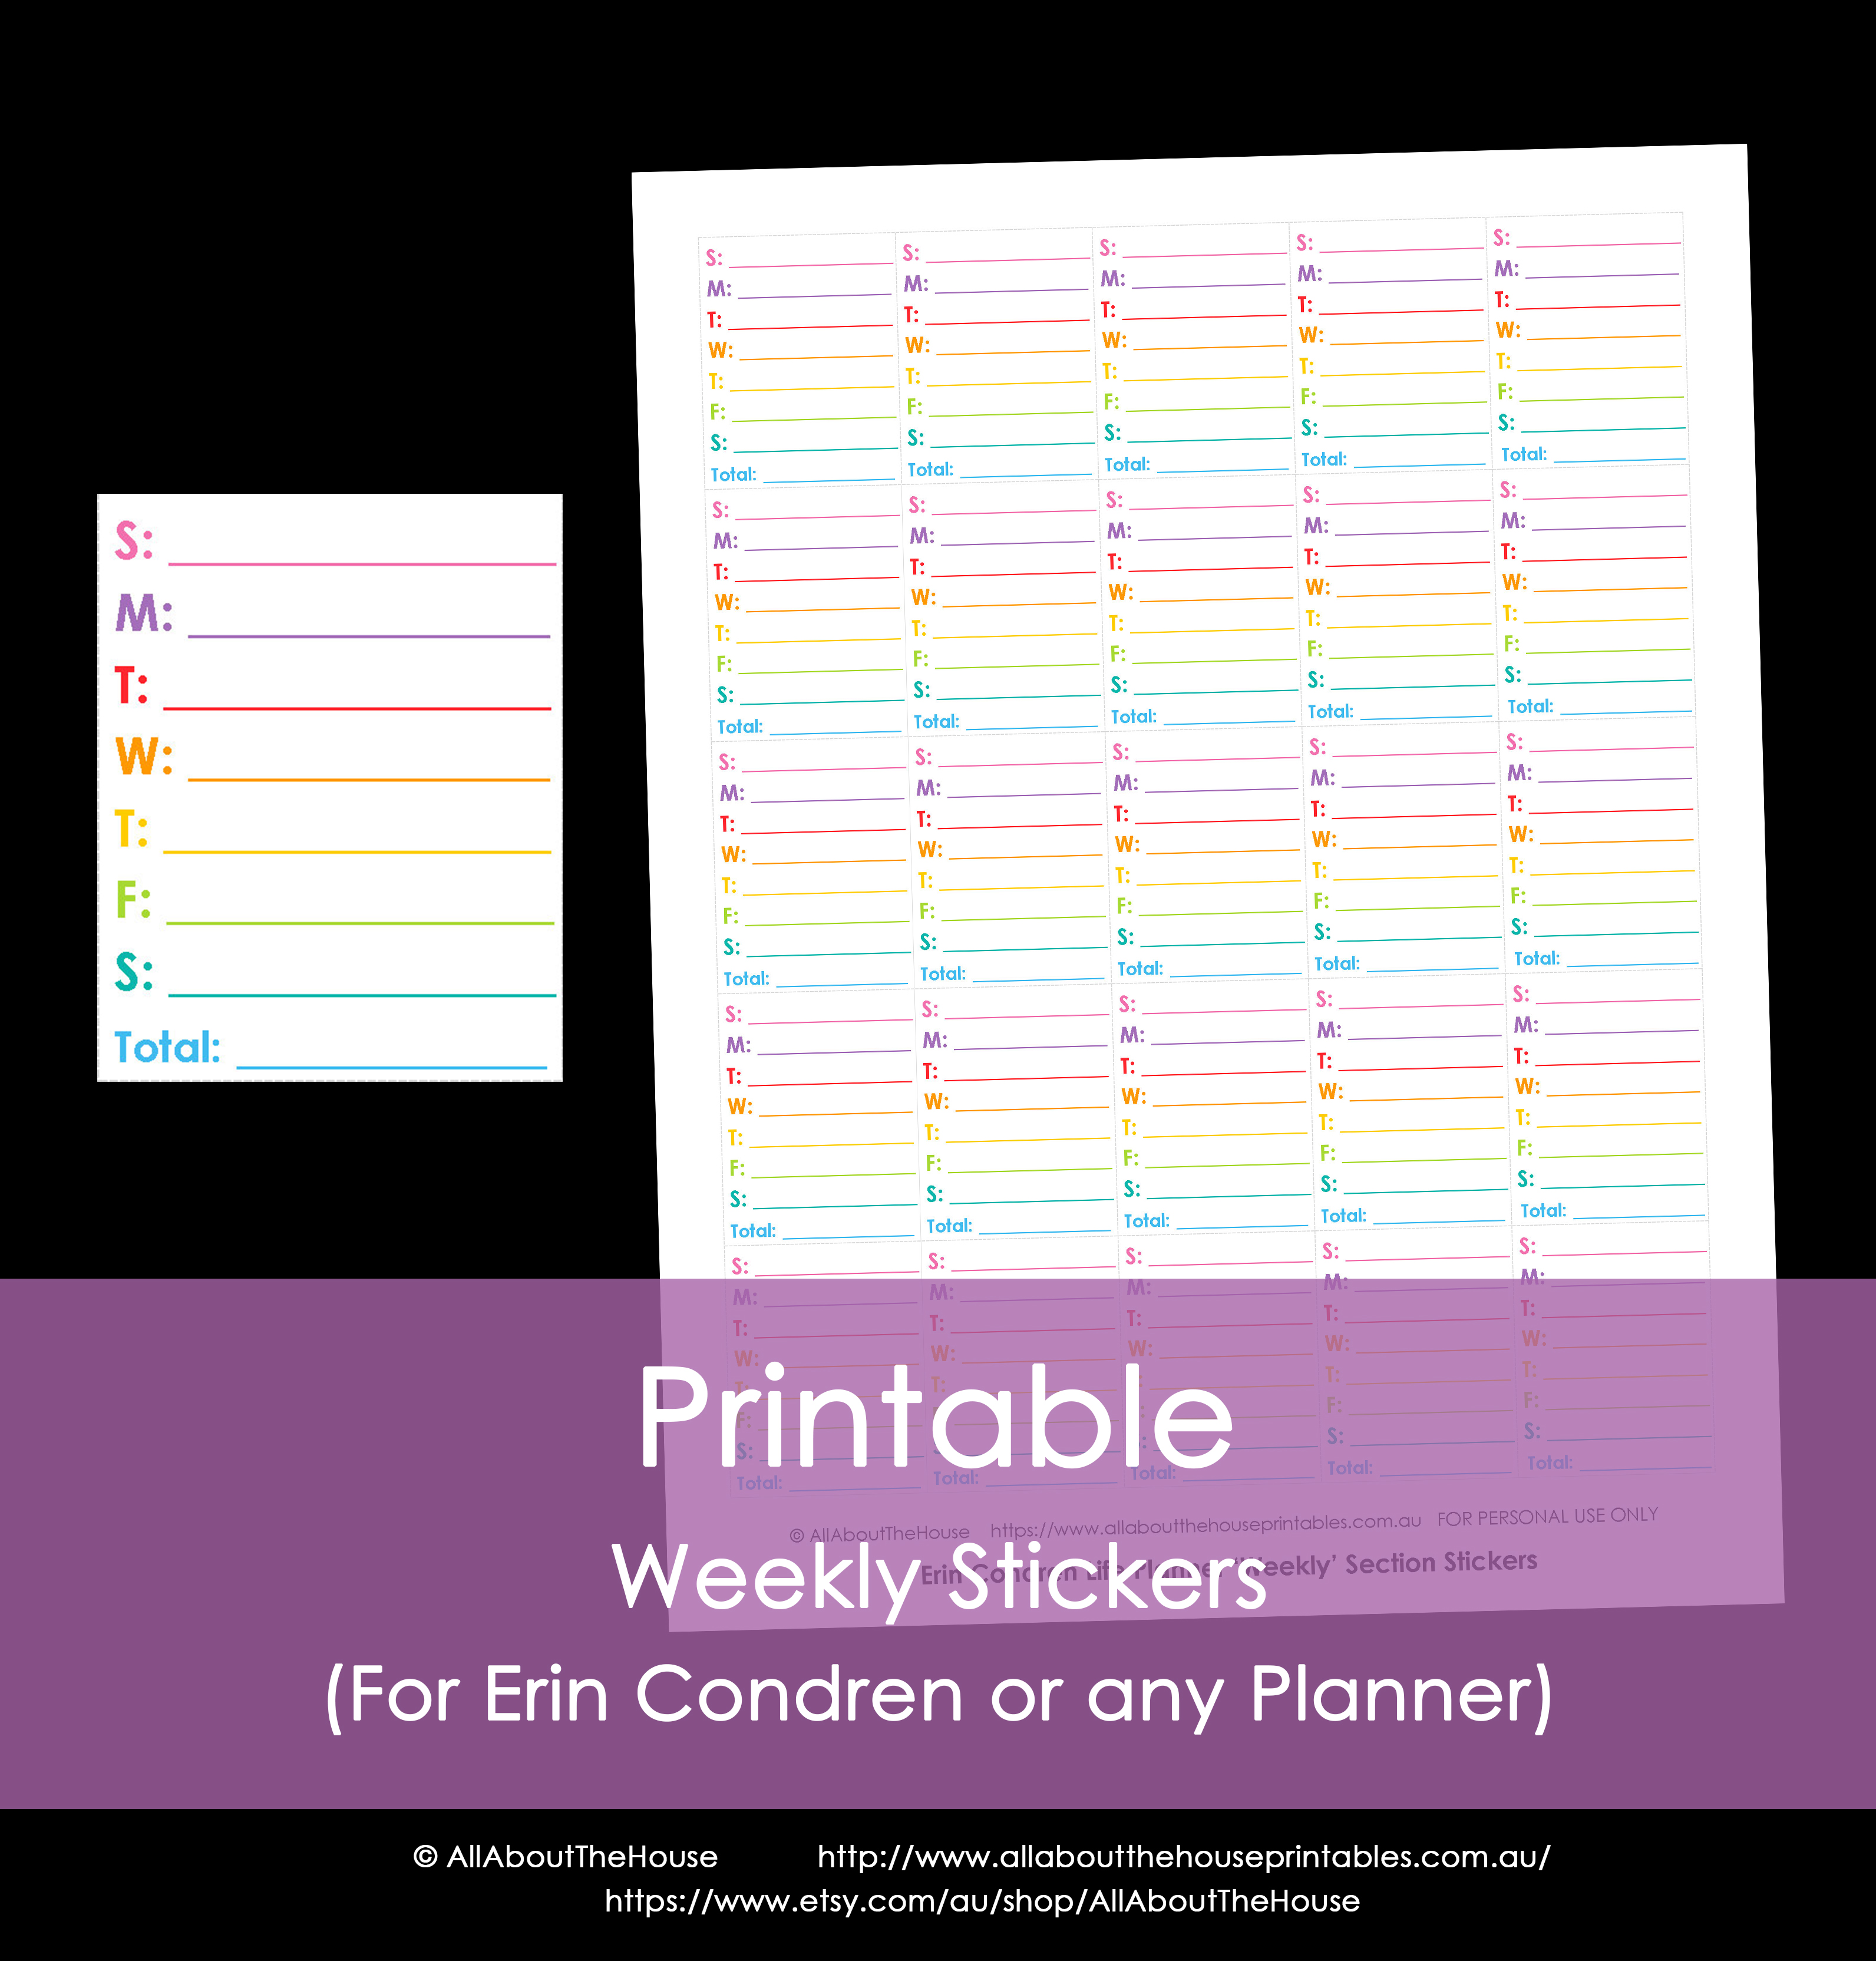
Weekly Stickers – Sunday and Monday start versions included – can be used for expense tracking, income tracking, meal planning, weight and measurements, calorie counting, number of steps, routine chores, prioritising most important task per day, gratitutde, medication/prescriptions, exercise for the week, hrs worked, hrs studied ect.
Numbered List – for priority to do lists, time scheduling ect.

Heart List Stickers – can be used for to do lists, chores, goals, homework, work tasks, blogging to dos, bills to pay ect.

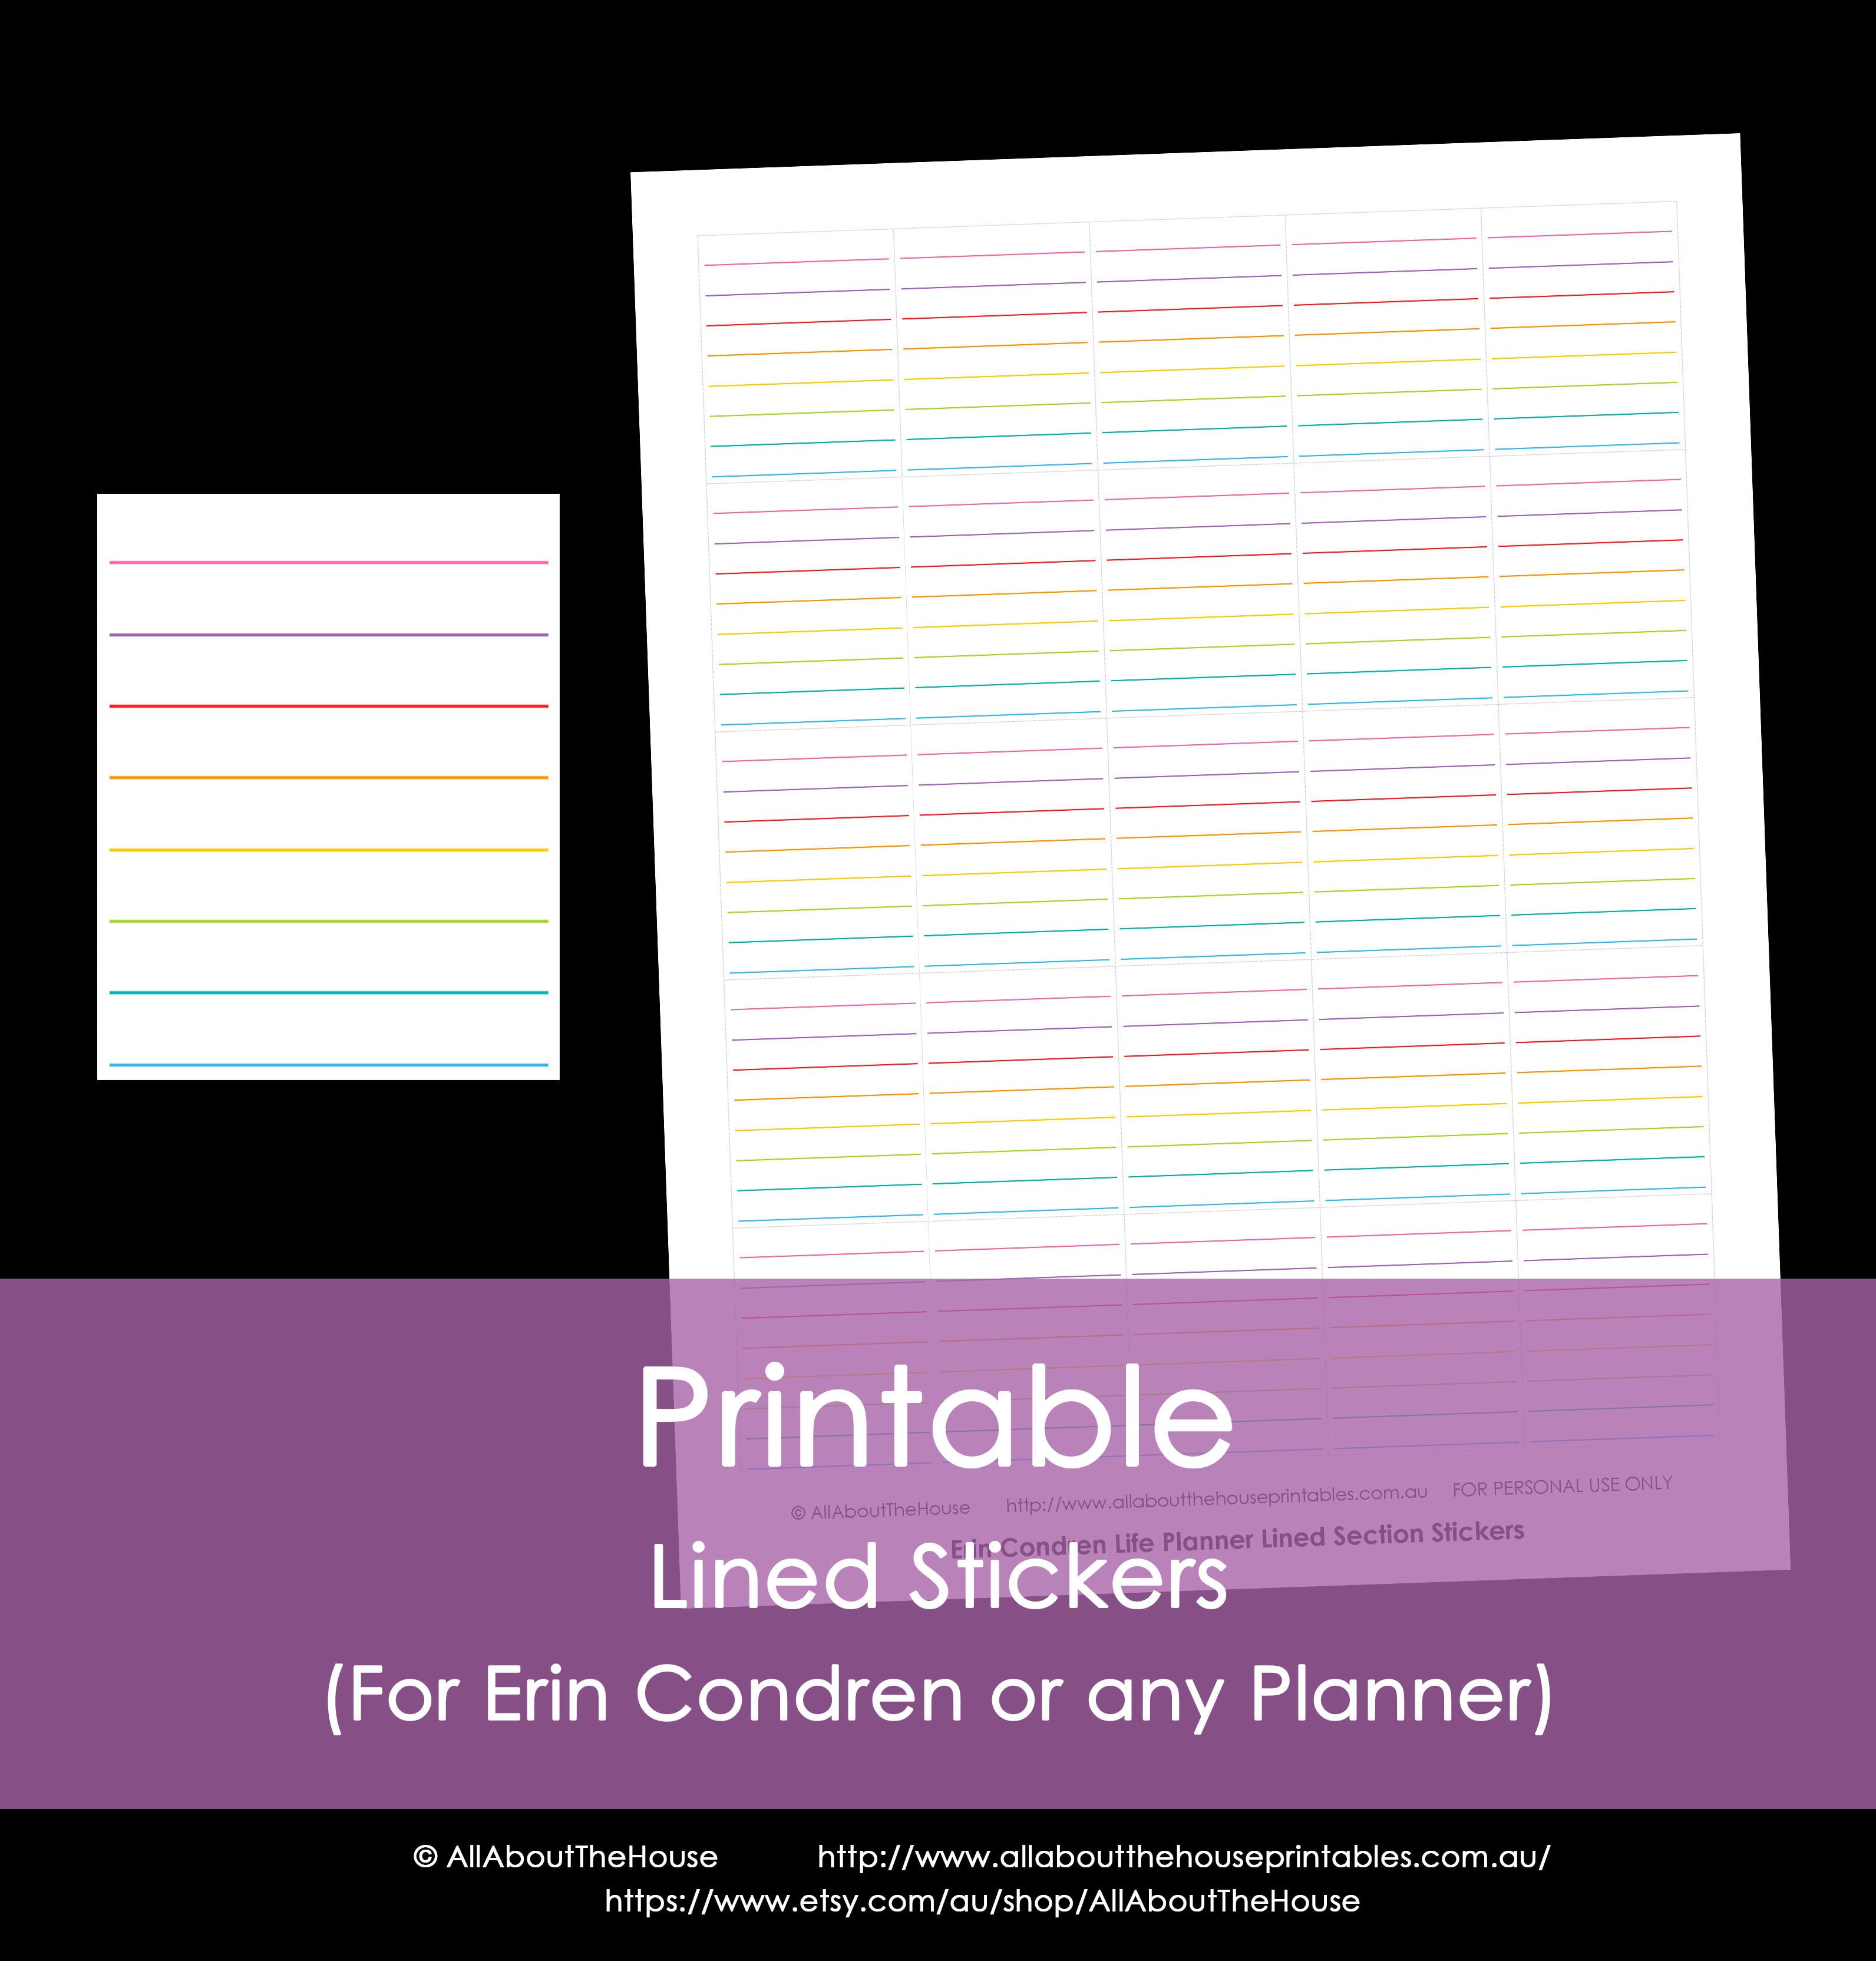
Lined Stickers – for general note taking, do lists, chores, goals, homework, meal planning, work tasks, blogging to dos, bills to be paid ect. Need half box size? (for underneath each day) – just cut to size
Flag stickers – large and small – width will fit the width of the white boxes under the morning/day/night headings. The small flags can be used in any direction e.g. lengthways or vertically (as shown below).
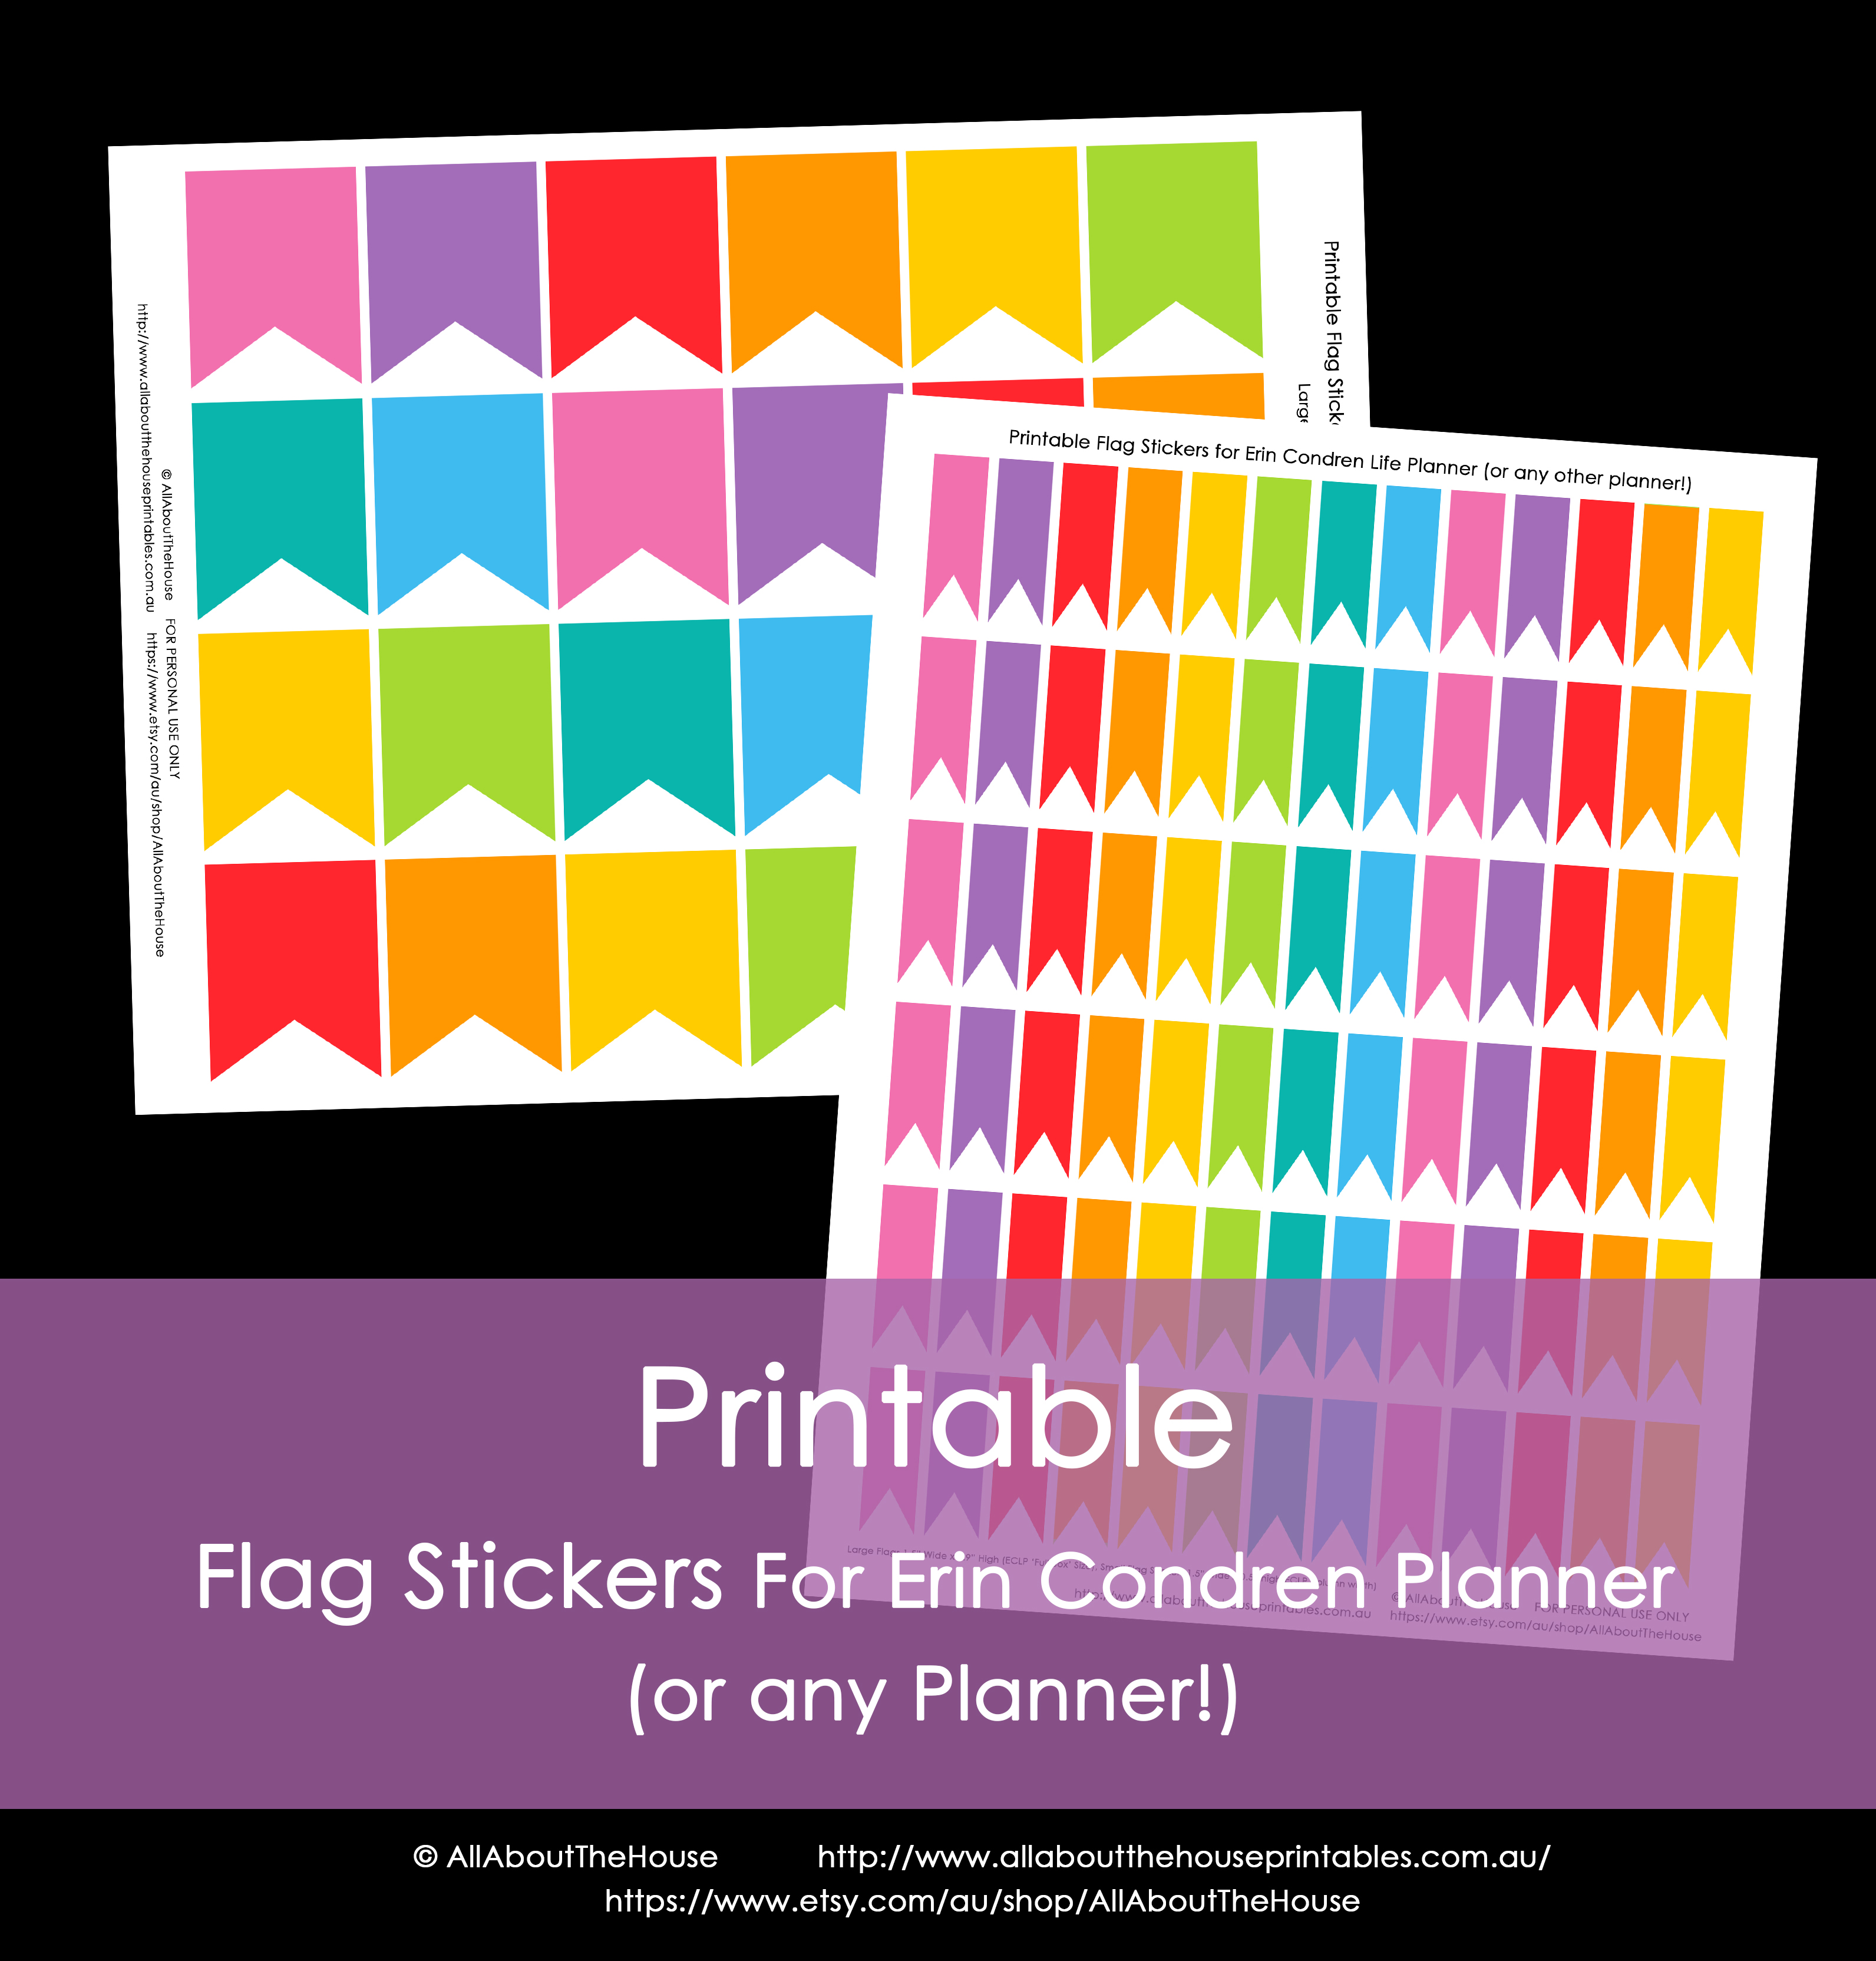
Large Flags (for the sections underneath the Morning/Day/Night titles) – in rainbow (as shown) and grey

Small Flags – you can rotate and use these in whatever direction works best for you – they fit the width of the white box underneath the ‘morning, day, night’ titles – they come in rainbow and grey

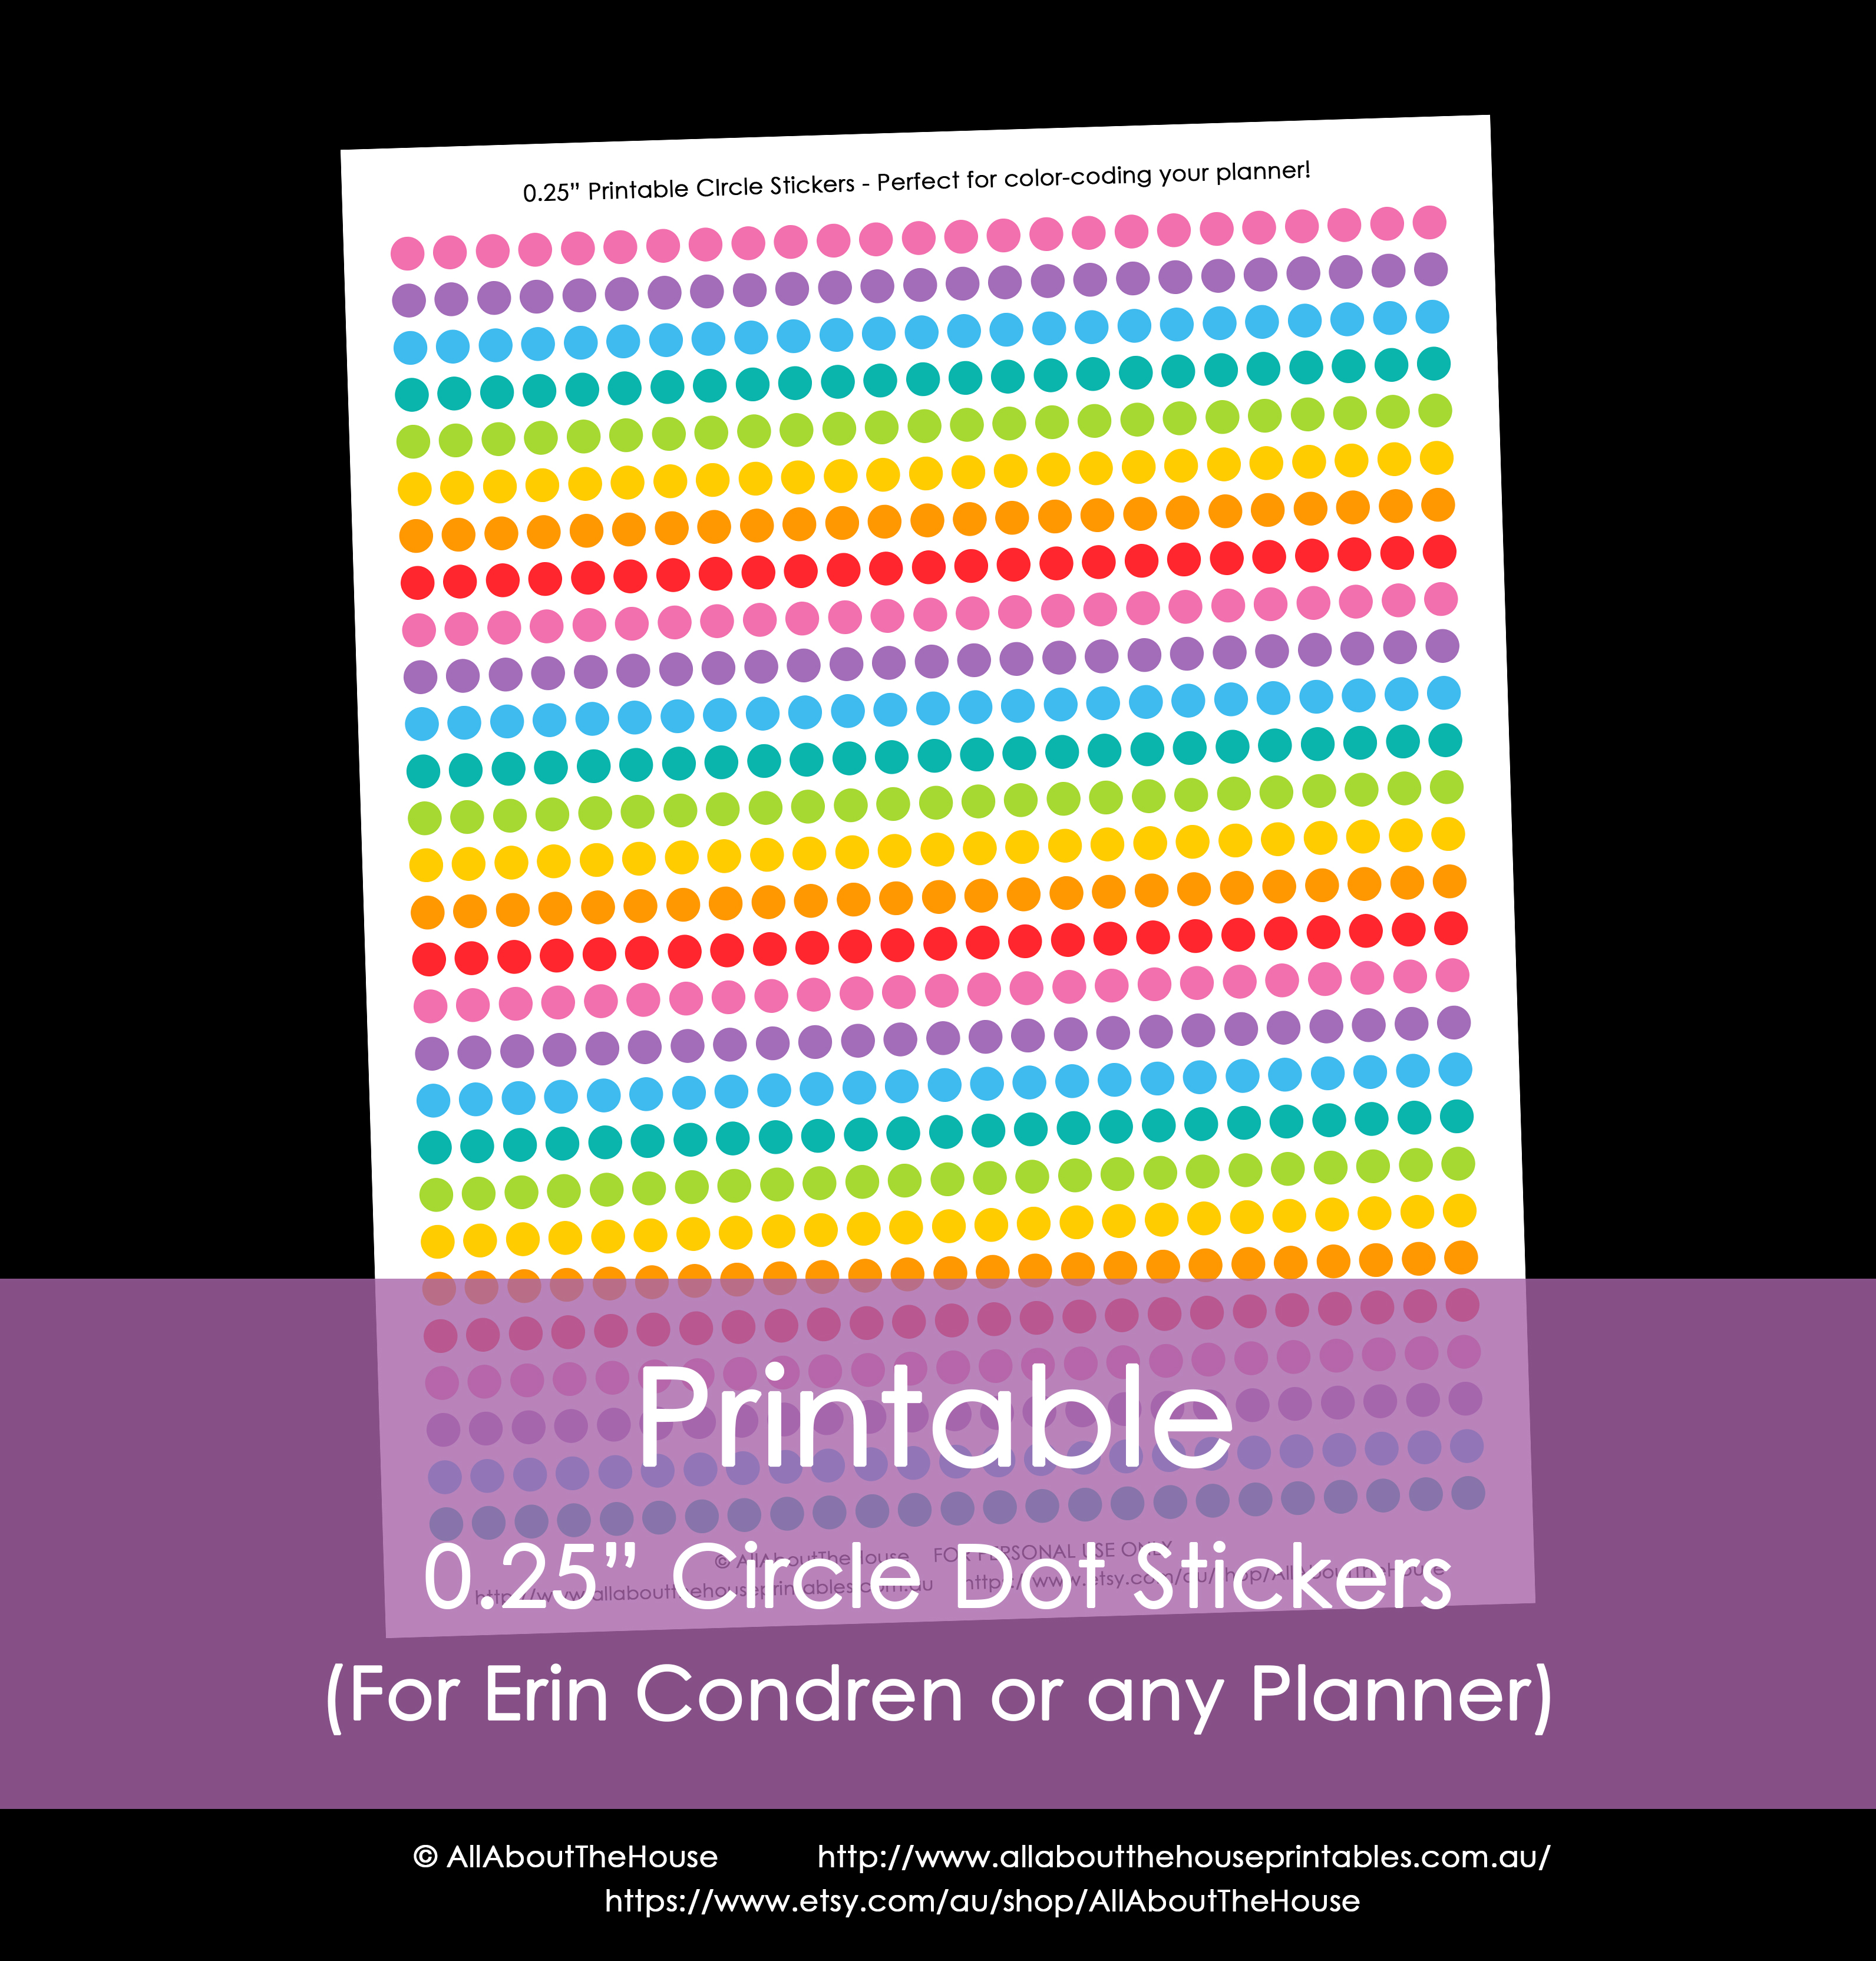
0.25″ (quarter inch) Round Stickers – great for colour-coding. Cut into strips and use in the white boxes underneath the morning/day/night titles, or print a strip and place over the lined goals section on the side (if you need another size or e.g. 0.25″ square stickers ), please contact me

Bill Due/Payments stickers – write the bill and amount in the white space. I use a different colour for each type of bill e.g. pink = electricity, purple = phone ect.

Study – High school/college student stickers

Shop all calendar/planner stickers on Etsy or in the online store – there are now over 250 stickers to choose from!
If you just can’t get it enough, you can now purchase all planner stickers currently available for one low price! Visit the Etsy shop to purchase!

And for all the planner addicts, you can purchase all stickers and all chevron planner printable sets currently available here
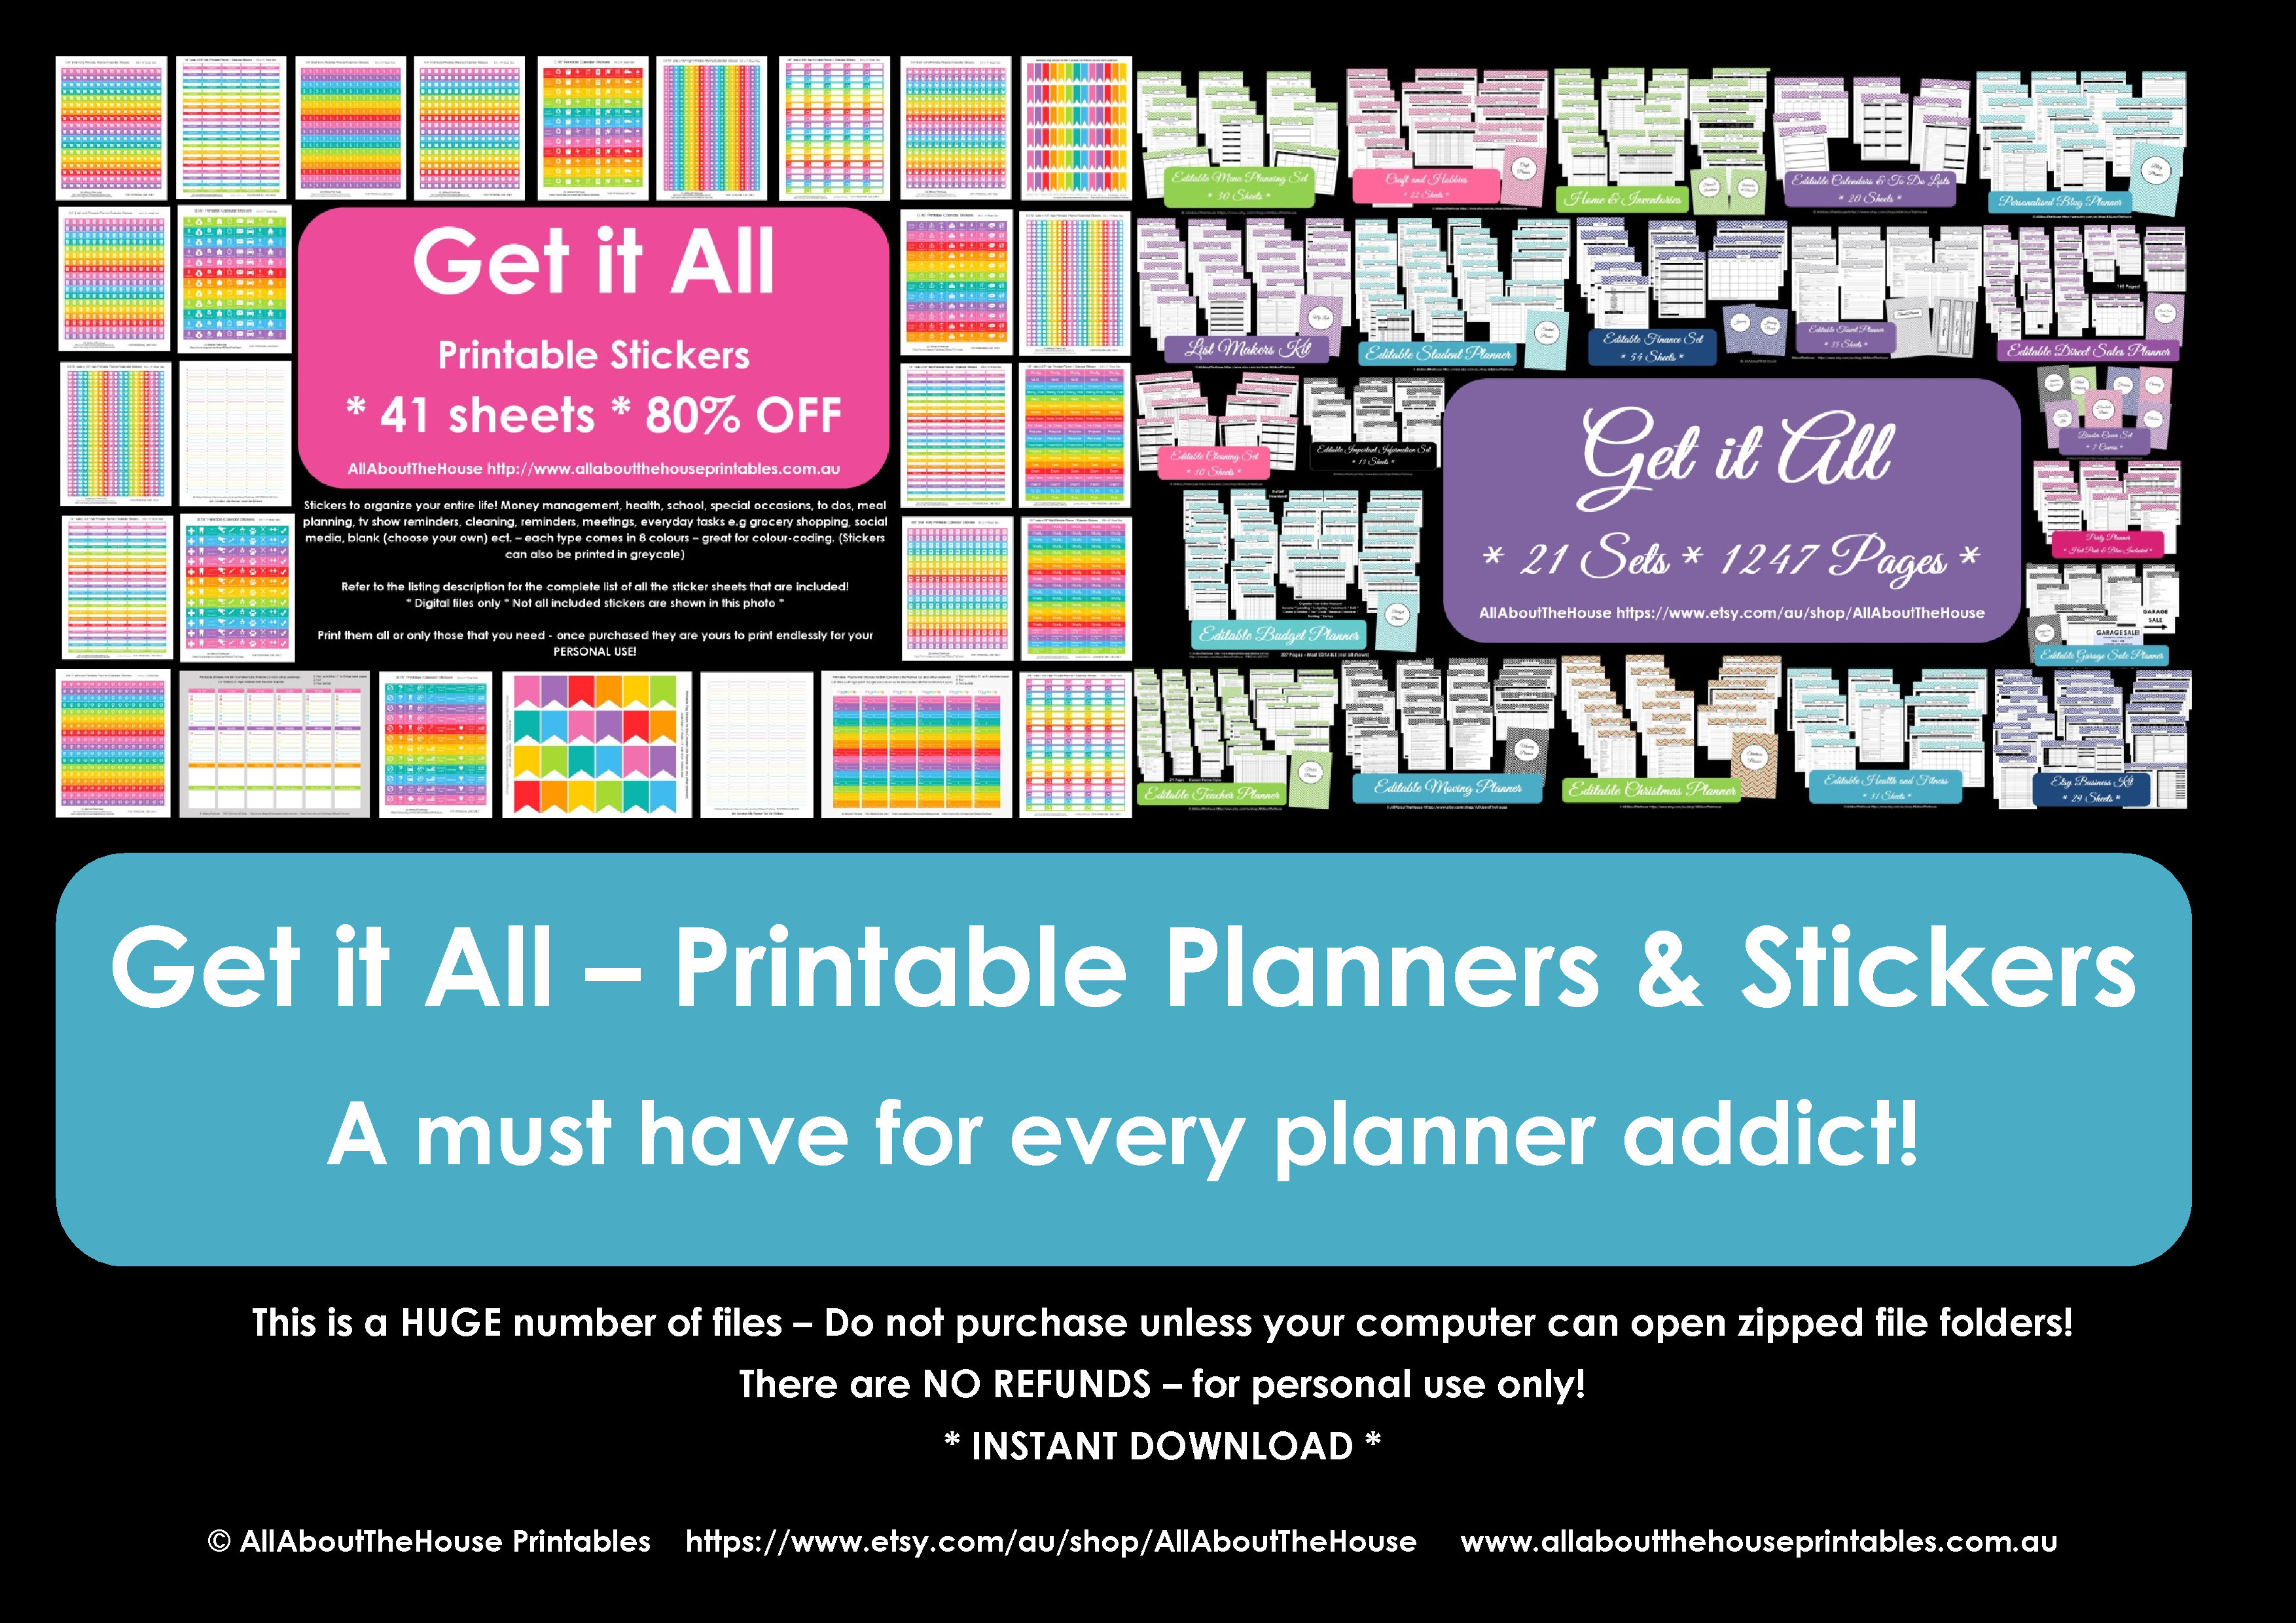
UPDATE: Unfortunately I have had to remove the Get It All bundles due to customers computers not being able to handle the MASSIVE number of files (hundreds) through one download link resulting in me having to send them via email which meant I was actually losing money.
The Get It All planner bundle is still available. But the Get It All sticker bundles have now been replaced with Choose 5, Choose 10, Choose 15, Choose 30, the Mystery Bundle (which contains a lot of best sellers!) and the Sticker Subscription (you choose the duration for the subscription).
A note about printing: matte sticker paper is recommended if you want to write on the stickers. See here for a list of places to purchase label paper from. Re-positionable full sheet label paper is available from Staples among other places. I’ve found that buying label paper online is cheaper than in store. Online Labels sells 100 sheets for $30 or just 30c for a whole page of stickers!
I also get asked how I cut the stickers. I use a paper trimmer I purchased a few years back. I can’t remember where I bought it from but it is similar to this one. I prefer that style of paper trimmer to this style as I find it easier to see where I’m cutting and easier to cut multiple sheets at once. I print off sticker sheets, set up my paper trimmer in the front of the tv and by the end of a show I’ve cut all the stickers! For the flag stickers I use scissors for the flag ends. If you want round stickers I recommend using a craft punch such as this one.
These stickers are STRICTLY FOR PERSONAL USE ONLY. NO COMMERCIAL USE is allowed including: reselling, printing and selling, sharing, giveaways and posting them on your blog for others to download. If someone you know would like a copy, please direct them to my store. You may NOT PROFIT FROM these stickers in any way – thank you for respecting the time it takes to create these designs!
I get a lot of enquires regarding if there is a printed and shipped to your door option for these stickers so I want to know:
I live in Australia – I know many of you live in the USA so the other thing I would like to know is:
I have some good news – you can also purchase the Photoshop templates I have created and make your own stickers. AND you CAN sell the stickers you make with the templates in digital and/or printed form. But you CANNOT sell the photoshop template, share, sell, giveaway (such as make directly available for download from your blog – please direct people to my store to purchase themselves if they are interested). If you are interested in purchasing, please contact me at allaboutthehouseetsy@yahoo.com.au
Customers often ask me how I make these stickers. To see if this would be feasible, please let me know how much you would pay for a comprehensive guide on how to make your own calendar stickers? (for personal and/or commercial use). I would include in the guide 5 different ways for making calendar stickers (with free and paid software) and where to buy sticker paper from (USA and Australia).
Are there any other sticker designs, colours or sizes you would like to see? If so, please comment below – I am a bit obsessed with making stickers at the moment!
For those of you who love washi tape, check out my sister’s Etsy store, CarefullyCraftedbyJo.
Because I am so grateful for my customers I’ve also made FREE dashboard printables! These use the same colour scheme as the Rainbow Planner and all of the calendar stickers.

The dashboards are 2.75″ wide x 6.75″ high which will fit pretty much any planner including: letter size planners, arc (letter size and junior size), A4, A5, filofax, portable daytimer, franklin covey, Plum Paper, both sizes of my Rainbow Planner and of course the Erin Condren life planner (or any of her notebooks ect.).
To make your dashboard
1. ‘Purchase‘ the template (it’s free – just add to cart and ‘checkout’) then print the template onto letter size 8.5 x 11″ or A4 size paper
To make double sided dashboard take 2 copies of the template e.g. one side the checklist, the other lined for notes and use double sided tape or glue tape (so the pages aren’t too fat to laminate) to adhere together before laminating. I recommend printing onto cardstock but this is not necessary.
2. Laminate
If you do not have a laminating machine – your local office supply store e.g. Staples, Officeworks ect. will do this for you inexpensively
3. Cut around the dashboard, leaving approx half an inch of laminate on one side for punching the holes
4. If using with your Erin Condren planner, you can purchase coil clips from her website. Otherwise use the Arc punch if you have an Arc notebook (this is what I did), or use a hole punch if you are using a 3 ring binder or similar.
5. Use dry erase markers or fine tip pens to write on and wipe clean with a cloth, tissue ect.
You can also print a bunch and turn them into a tear-off notepad. Add a magnet and place on your fridge for a grocery list, meal planning ect. There are many tutorials for how to do this, here are a few: Playful Learning, She Knows, Skip To My Lou, ChicandJo, agusyornet and ThreeBySea. When I made mine I used modge podge. If you’re concerned about printer ink – the stripes also print nicely in greyscale.
A note about free printables:
